Deploy Images
NXP's Manufacturing Tool currently exists in two versions. MFGTool is the old version and UUU (Universal Update Utility) is the new version.
| UUU | MFGTool | |
|---|---|---|
| Version | V3 | V2 |
| Actively developed | Yes | No |
| OS Support | Windows + Linux | Windows only |
| Source Code | Yes, Github | No |
As of May 2019, Embedded Artists plan to keep MFGTool support for old kernel releases (i.e. prior to Linux 4.14.78). For Linux 4.14.78 there will be a transition time where both MFGTool and UUU will be available. For all releases after Linux 4.14.78, only UUU will be supported.
Prepare Hardware
Begin by reading the Getting Started Guide for the board you are using. It shows how to setup the board and also gives an overview of the hardware. The next step is to put the board into OTG boot mode.
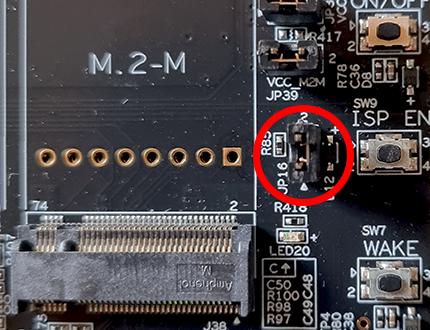
OTG boot mode - SOM Carrier board
For the SOM Carrier board close jumper JP16 to put the board into OTG boot mode. You find this jumper to the left of the ISP_EN button.
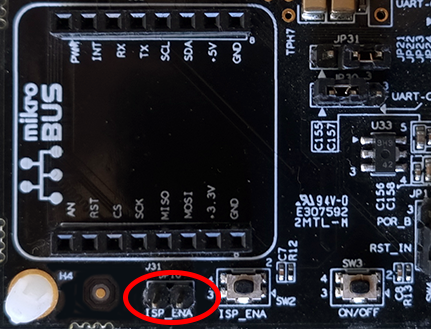
OTG boot mode - Carrier board V3
For the uCOM Carrier board V3 close jumper JP10 to put the board into OTG boot mode. You find this jumper at the lower left corner of the carrier board, just below the mikrobus expansion connector.
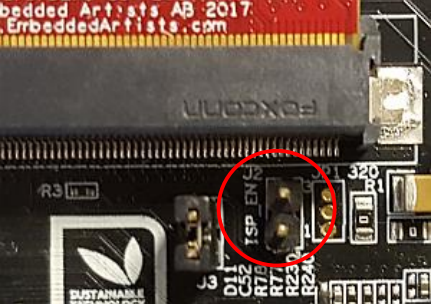
OTG boot mode - Carrier board V2
For the COM Carrier board V2 close jumper J2 to put the board into OTG boot mode. You find this jumper at the lower right corner of the MXM3 connector as can be seen in the photo below.
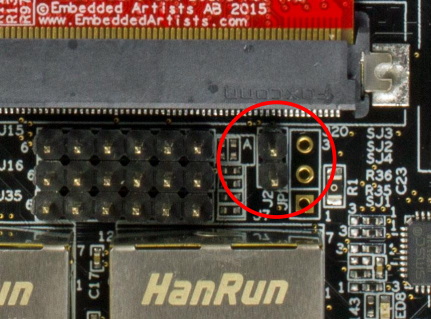
OTG boot mode - Carrier board V1
For the COM Carrier board V1 close jumper J2 to put the board into OTG boot mode. You find this jumper at the lower right corner of the MXM3 connector as can be seen in the photo below.
DIP Switches - iMX6 SoloX COM board
The first version of the iMX6 SoloX COM boards had boot jumpers (DIP switches) mounted on them. If you have such a COM board you need to set the boot jumpers as described below to force it into OTG boot mode instead of closing jumper J2 as described above.
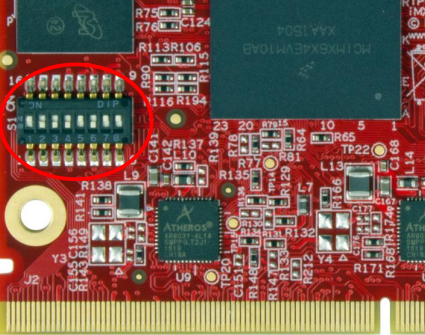

- Set the boot jumpers in OTG boot mode as shown above. First jumper in the up position and the second jumper in down position.
- Make sure a USB cable is connected between the board (micro-B connector on carrier board) and your PC
- Reset the board
When you want to boot the software from eMMC you have to reverse the setting, that is, first jumper in down position and second jumper in up position
UUU - Universal Update Utility
UUU (Universal Update Utility) is version 3 of MFGTool but it has been rewritten, is publicly available on GitHub and it can be run on both Windows and Linux while the older versions of MFGTool were limited to Windows only.
UUU can be used to write images to the board. This tool is sending files and instructions over USB and the board must be set in OTG boot mode for it to work.
Starting with Linux 4.14.78, a uuu-zip file will be made available in addition to the mfgtool zip files on https://sw.embeddedartists.com/ for the board you are using. Note that iMX8M Quad COM, iMX8M Mini uCOM, iMX8M Nano, and iMX7ULP uCOM boards will not have an mfgtool zip file.
Prerequisites:
- Ubuntu 16.04 or above, 64-bit
- Windows 10, 64-bit
- Windows 7, 64-bit - note that there might be problems with drivers and that it might not even work with the driver fixes applied even if the documentation says it does. The Windows 7 specific instructions can be found here: https://github.com/NXPmicro/mfgtools/wiki/WIN7-User-Guide
Userful links:
- UUU on GitHub: https://github.com/NXPmicro/mfgtools
- UUU release page: https://github.com/NXPmicro/mfgtools/releases
Download the tool
Download the zip file for the board you are using from https://sw.embeddedartists.com/. Unpack this zip file somewhere on your computer. Below is a description of some of the content in the zip file.
*.uuu: The different download configurations.bootloader.uuu– will install only the bootloaders. This should only be used if you want to restore the bootloaders or download your own bootloaders to the board.bootloader_combined.uuu– will install only the bootloaders. This is a faster alternative to bootloader.uuu but it requires a binary where SPL and the U-Boot have been combined, see section Create combined binary below. This should only be used if you want to restore the bootloaders or download your own bootloaders to the board.kernel.uuu– will install kernel and dtb files. This should only be used if you want to update the kernel or dtb files.full_tar.uuu– will install bootloaders, Linux kernel and root file system. The root file system will be installed from a tar.bz2 file.wic_example.uuu– shows how to install everything from a wic file. Normally the wic file is not included in the zip file.
/files/: Contains pre-compiled versions of images. The tool will look in this directory when selecting images to download to the board.
Run in Ubuntu
On Linux open a terminal, navigate to the folder where the uuu zip file was unpacked, make sure that the tool is executable and then execute the tool.
cd ~/uuu_imx8mq_com_4.14.78
chmod +x ./uuu
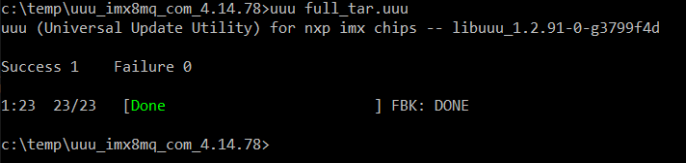
sudo ./uuu full_tar.uuu
The terminal will show a progress bar like this while it is running.

After a successful run it will look like this.

If a problem occurs then the program will terminate and print an error message like this.

Run in Windows
On Windows open a Command Prompt, navigate to the folder where the uuu zip file was unpacked and then run the tool.
C:\> cd c:\temp\uuu_imx8mq_com_4.14.78
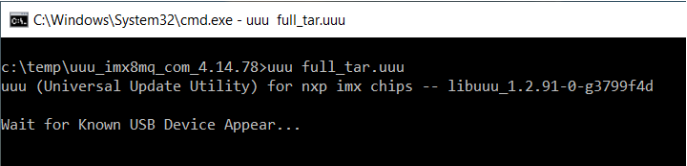
C:\temp\uuu_imx8mq_com_4.14.78> uuu.exe full_tar.uuu
The terminal will show a progress bar like this while it is running.

After a successful run it will look like this.
If a problem occurs then the program will terminate and print an error message like this.

Use your own images
The uuu zip file that you download from sw.embeddedartists.com contain the latest build from Embedded Artists.
The simplest way to download your own images is to replace the existing file(s) in the zip file with your own file(s). If you keep the file names intact the *.uuu configurations will download your version of the file.
Troubleshoot
Some common problems and solutions.
The first time you run uuu on your computer it fails
This is likely because of USB driver installation. Let the driver install, reset the hardware and then run the uuu command again. In Windows it is three different drivers that are needed so this procedure might have to be repeated three times - each time the procedure gets a little bit further.
UUU appears to hang with a "Wait for Known USB Device Appear..."
This means that the hardware is either not connected to the computer with the USB cable or it is not in the OTG boot mode. Check section Prepare hardware again to make sure you have set the OTG boot jumper correctly.
Windows 7 fail to flash
If the error looks like below it could be a driver problem.

Follow the instructions here: https://github.com/NXPmicro/mfgtools/wiki/WIN7-User-Guide
Running wic_example.uuu complains about missing wic file
That file is normally not supplied in the downloaded zip file but you will find it in the "deploy" folder after you complete your own yocto build.
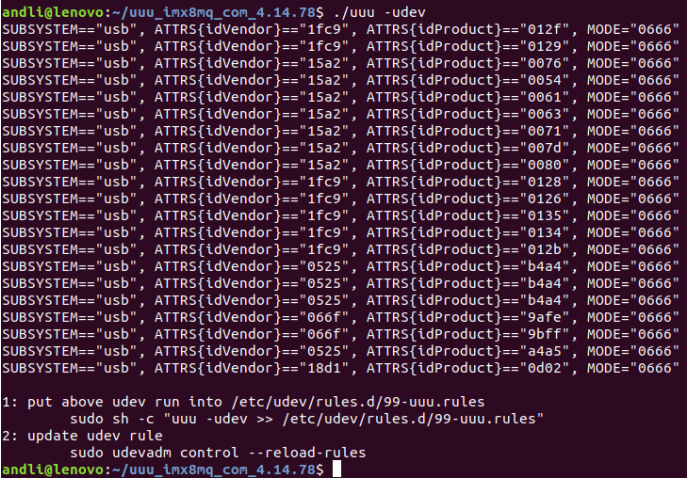
UUU in Ubuntu reports failure to open usb device
The error looks similar to below.

This happens if the uuu program is not executed with the correct rights. Either use sudo uuu or setup udev rules so that sudo rights are not needed. The instructions for how to create the udev rules are built into the tool so run uuu -udev and then follow the steps.
Create combined binary
If you want to create the combined binary to use with bootloader_combined.uuu run the following commands in Linux.
dd if=SPL of=spl_and_uboot.bin bs=1024
dd if=u-boot.img of=spl_and_uboot.bin bs=1024 seek=68
Manufacturing Tool
NXP's Manufacturing Tool (MFGTool) can be used to write images to the board. This tool is sending files and instructions over USB and the board must be set in OTG boot mode for it to work.
We recommend that you start using UUU instead of the Manufacturing Tool.
At the moment the tool is only available for Microsoft Windows and a version which has been prepared for Embedded Artists boards is available on sw.embeddedartists.com for the board you are using.
Download the tool
Download the zip file containing the manufacturing tool from sw.embeddedartists.com. Unpack this zip file somewhere on your computer running Microsoft Windows. Below is a description of some of the content in the zip file.
*.vbs: Shortcuts to download configurations (the actual configurations are available in the ucl2.xml file).ea-com-emmc_bootloaders.vbs– will install only the bootloaders. This should only be used if you want to restore the bootloaders or download your own bootloaders to the board.ea-com-emmc_kernel.vbs– will install kernel and dtb files. This should only be used if you want to update the kernel or dtb file.ea-com-emmc_full_tar.vbs– will install bootloaders, Linux kernel and root file system. The root file system will be installed from a tar.bz2 file.ea-com-emmc_update_rootfs.vbs– will only download the root file system (the ext3 file) to the board.
/Document: Contains documentation for the manufacturing tool. This documentation has been written by NXP./Profiles/Linux/OS Firmware/ucl2.xml: This file contains the download configurations./Profiles/Linux/OS Firmware/files: Contains pre-compiled versions of images. The tool will look in this directory when selecting images to download to the board
Run in Windows
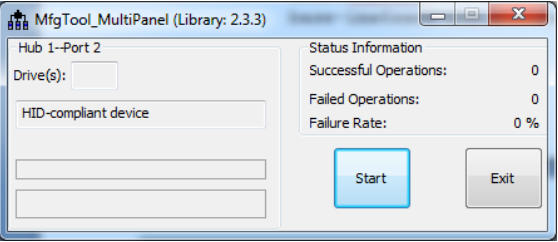
Double click on one of the vbs files to start the manufacturing tool. If the tool can find the board it will write HID-compliant device in the status field. If it cannot find the board it will write No Device Connected.
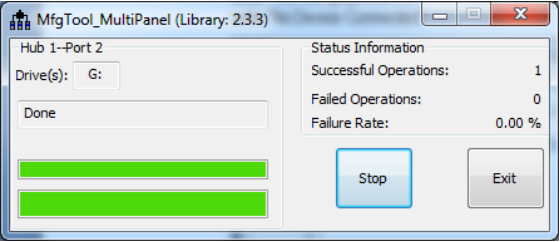
Click the Start button to start the download of files. If all operations are successful the progress bars will turn green. Click the Stop button and then Exit to close the manufacturing tool. If an operation fails the progress bars will turn red. In this case it can be helpful to have a look at the log MfgTool.log which is found in the same directory as the manufacturing tool.
Use your own images
The simplest way to download your own images is to replace the existing file(s) with your file(s). If you keep the file names intact the vbs files will download your version of the file.
In many cases you would, however, like to keep the pre-compiled versions of the files and just add your own files. You could then copy an existing vbs file that is closest to what you want to do, for example, copy the ...update_rootfs.vbs file if you want to update only the root file system. When you open this copy of the file you can see that several options are sent to the manufacturing tool. For example, one option is called board and another is called rootfs. These options are used in the configuration file (ucl2.xml) to construct the actual file names of the files the tool is accessing.
The name of the file for the root file system is, for example, constructed by using both the rootfs and board options. This is how it looks in the ucl2.xmlfile: files/%rootfs%-%board%.rootfs.tar.bz2.
One more alternative is to create a new configuration. In this case you need to open the ucl2.xml file and then copy an existing configuration (the LIST tag and all its children), give it a new name (change the name attribute) and then modify the instructions so your images are downloaded.
Update from within U-Boot
An alternative to the manufacturing tool is to use the U-Boot bootloader. This bootloader is usually already programmed onto the board when delivered from Embedded Artists.
U-Boot supports loading files from many sources (network, SD card, USB memory stick), but this section will only describe how to load from a USB memory stick. Copy your files to a USB memory stick and then insert this into the USB Host Connector on the Carrier Board. See the Getting Started guide for your board for details about connectors.
Find the USB Memory Stick
You need to have a terminal/console application such as Tera Term connected to the board. When the board boots stop U-Boot from continuing with the boot (by default you have 3 seconds to hit any key so the autoboot stops).
- Enable the USB interface
usb start
- Find attached storage devices. In the example below only one device is attached and will therefore get device index zero (‘0’). You need to know this index when accessing the device in later steps.
usb storage
Device 0: Vendor: Kingston Rev: 1.00 Prod: DataTraveler R
          Type: Removable Hard Disk
          Capacity: 959.0 MB = 0.9 GB (1964032 x 512)
- List the content on the USB device to see that your files are available on the device. The zero in the instructions below is the device index.
fatls usb 0
Load the Root File System
To replace only the root file system, use the ext3 image, that is the file with extension ext3. You must have followed the instructions in section above to make sure the USB interface is enabled.
Files are loaded into RAM memory which means that they must be smaller than the memory on the board.
- Load the
ext3image into memory. In the example below USB device 0 is accessed and the filerootfs.ext3is loaded to address0x83000000. The size of the loaded file is 79691776 bytes. This information is important and needed in step 3. The size may be different in your case.
fatload usb 0 0x83000000 rootfs.ext3
reading rootfs.ext3
79691776 bytes read in 3466 ms (21.9 MiB/s)
- Find the offset to the file system partition. If you are using the default setup from Embedded Artists the root file system will be in partition 2 which as shown in the example below is available at offset
24576 (0x6000). Partition 1 contains the Linux kernel and device tree (dtb) files.
mmc part
Partition Map for MMC device 1 -- Partition Type: DOS

Part   Start Sector   Num Sectors   UUID        Type
   1   8192           16384         00027f23-01 0c
   2   24576          155648        00027f23-02 83
- Write the file to eMMC. The eMMC memory is available on mmc device 1 and as found in the previous step partition 2 starts at offset 0x6000. The amount of data to write to the mmc device must be given in number of blocks where each block is 512 bytes. The value must be written as a hexadecimal value. 79691776 / 512 = 155648 (0x26000).
mmc write 0x83000000 0x6000 0x26000
- A new root file system has now been written to the device and the board can be rebooted.
Update from within Linux
It is also possible to do updates to the system from within Linux.
Kernel image and dtb files
Kernel images and dtb (device tree) files are available on a partition of eMMC that is normally not mounted. The instructions below show how to update the kernel image and dtb file (or add new dtb files) from a USB memory stick to the eMMC partition.
- Copy the files to a USB memory stick.
- Boot into Linux and then insert this into the USB Host Connector on the Carrier Board. You will see output in the console as below.
new high-speed USB device number 3 using ci_hdrc
usb-storage 1-1.3:1.0: USB Mass Storage device detected

scsi0 : usb-storage 1-1.3:1.0
scsi 0:0:0:0: Direct-Access SanDisk Cruzer 8.02 PQ: 0 ANSI: 0 CCS
scsi 0:0:0:1: CD-ROM SanDisk Cruzer 8.02 PQ: 0 ANSI: 0
sd 0:0:0:0: [sda] Attached SCSI removable disk
sd 0:0:0:0: [sda] 15704063 512-byte logical blocks: (8.04 GB/7.48GiB)
sd 0:0:0:0: [sda] No Caching mode page found
sd 0:0:0:0: [sda] Assuming drive cache: write through
sd 0:0:0:0: [sda] No Caching mode page found
sd 0:0:0:0: [sda] Assuming drive cache: write through
  sda: sda1
- Mount the USB memory stick and eMMC partition. The USB memory stick has in this example the device name
sda1as can be seen in the output in step 2 above. The partition on the eMMC is in this example available at/dev/mmcblk2p1, but this could be different on different COM boards.
mkdir /mnt/usb
mount /dev/sda1 /mnt/usb
mkdir /mnt/mmcboot
mount /dev/mmcblk2p1 /mnt/mmcboot
- Copy the bin file and / or dtb file from the USB memory stick to the boot partition.
cp /mnt/usb/zImage /mnt/mmcboot
cp /mnt/usb/imx6sxea-com-kit.dtb /mnt/mmcboot
- Un-mount devices.
umount /mnt/usb
umount /mnt/mmcboot