OTA on iMX RT1176 using SBL and SFW
Introduction
Over-the-air (OTA) updates, also sometimes known as remote updates, is a solution for remotely updating the software on a device. Remotely meaning that you don’t need physical access to the device when updating its software.
This document focuses on NXP’s software framework which they call MCU SBL and SFW. SBL stands for Secure Bootloader and SFW stands for Secure Firmware.
The main description and instructions for how to use the framework is available in NXP’s document MCU-OTA SBL and SFW User Guide. It is recommended that you read through NXP’s document to get a better understanding of their software before following the instructions in this document.
This specific document is providing instructions for how to use the software on Embedded Artists iMX RT1176 Developer’s Kit and should be seen as a complement to NXP’s document.
NXP’s documentation describes remote OTA via both Amazon AWS IoT and Alibaba Aliyun, but we have only verified functionality on AWS IoT.
Build the software
Secure Bootloader (SBL)
This section contains instructions for building SBL on a Windows host using GNU Arm Embedded Toolchain (GCC_ARM). NXP’s documentation (chapter 2 in Rev 1.1.0) also describes how to use IAR and Keil MDK toolchain as well as building on a Linux host.
We will use the target evkmimxrt1170 in these instructions. For SBL, this target doesn’t have to be modified to work with the Embedded Artists iMX RT1176 Developer’s Kit.
Install Arm GCC toolchain
Go to the download section on the Arm Developer website and download a toolchain for your host. https://developer.arm.com/tools-and-software/open-source-software/developer-tools/gnu-toolchain/gnu-rm
Get the source code
You must have git tools installed on your computer to follow these instructions. You can for example use https://gitforwindows.org/.
In this example we do the development in the directory mcu-ota-sbl.
cd <your path>/mcu-ota-sbl
git clone https://github.com/NXPmicro/sbl.git
Select toolchain
The path to the toolchain must be configured in sblprofile.py.
- Open
sbl\target\evkmimxrt1170\sblprofile.py - Locate the variable
EXEC_PATHwithin the ifCROSS_TOOL == ‘gcc’statementif CROSS_TOOL == 'gcc':
PLATFORM = 'gcc'
EXEC_PATH = - Set
EXEC_PATHto the path of the toolchain you installed in the Install Arm GCC toolchain section above. In this example it was set to:
r'E:\Program Files\GNU Arm Embedded Toolchain\10_2021.10\bin'
Build the project
The project is built with the help of SCons which is an open-source build system written in Python. This build system is included when getting the source code and is setup using the env.bat file.
- Run
sbl\target\evkmimxrt1170\env.batand you will get a command prompt initialized to use SCons. - Within the command prompt run scons to build the project
> scons
- If successfully built the sbl.bin file will be available in the sbl\target\evkmimxrt1170\build directory.
- Follow the instructions in the Deploy sotfware - SBL section to deploy the image to the iMX RT1176 kit.
Secure Firmware (SFW)
This section contains instructions for building SFW on a Windows host using GNU Arm Embedded Toolchain (GCC_ARM). NXP’s documentation (chapter 2 in Rev 1.1.0) also describes how to use IAR and Keil MDK toolchain as well as building on a Linux host.
We will use the target evkmimxrt1170 in these instructions, but it must be patched to work with the Embedded Artists iMX RT1176 Developer’s Kit since a different Ethernet PHY is used.
See the Use pre-build software section if you want to use a pre-built image of SBL.
Install Arm GCC toolchain
Go to the download section on the Arm Developer website and download a toolchain for your host. https://developer.arm.com/tools-and-software/open-source-software/developer-tools/gnu-toolchain/gnu-rm
If you followed the instructions in the Install Arm GCC toolchain section you already have the toolchain installed.
Get the source code
You must have git tools installed on your computer to follow these instructions. You can for example use https://gitforwindows.org/.
The instructions have been tested on version v1.1.0. The exact commit being tested was d7e76dbe1bf481bd7d4a7fbb167005bbfec8db6e.
In this example we do the development in the directory mcu-ota-sbl.
cd <your path>/mcu-ota-sbl
git clone https://github.com/NXPmicro/sfw.git
cd sfw
git checkout tags/v1.1.0
Patch the source code
The Embedded Artists iMX RT1176 uCOM board use a different Ethernet Phy than the NXP RT1170 EVK. Follow these instructions to apply a patch that changes the Ethernet Phy.
- First go to your working directory for the project
cd <your path>/mcu-ota-sbl
- Download the patch from https://sw.embeddedartists.com/imxrt/sfw_ea_rt1176_phy_ar8031.patch
- Go to the sfw directory and apply the patch using git tools.
cd sfw
git apply ../sfw_ea_rt1176_phy_ar8031.patch
Setup AWS
Before continuing building SFW you must setup AWS as described in the AWS OTA section in NXP’s documentation. In Rev 1.1.0 of the document the subsection was called 7.3.1.1 - AWS OTA Prerequisites. This section will create certificates, IAM user, permissions, and an IoT Thing.
When you have configured AWS you should follow the instructions in subsection 7.3.1.3 – Prepare the SFW. In that subsection you will include the certificate and key associated with your AWS IoT Thing into the SFW build. You will also configure SFW to enable AWS and to set the MQTT broker DNS name as well as the AWS IoT Thing name.
Build the project
The project is built with the help of SCons which is an open-source build system written in Python. This build system is included when getting the source code and is setup using the env.bat file.
- Run
sfw\target\evkmimxrt1170\env.batand you will get a command prompt initialized to use SCons. - Within the command prompt run scons to build the project
scons
- If successfully built the
sfw.binfile will be available in thesfw\target\evkmimxrt1170\builddirectory. - The image must be signed before deployed to target. Copy
sfw.bintosbl\component\secure\mcuboot\scriptsand rename tosfw_092.bin. The appendix 092 indicates the version of the firmware. This version is specified insfw\firmware\aws_ota\main_enet.c(APP_VERSION_MAJOR,APP_VERSION_MINOR, andAPP_VERSION_BUILD). - Within the SCons command prompt sign the image. The signed image will have the file name
sfw092.binin this example.
python imgtool.py sign --key sign-rsa2048-priv.pem --align 4 --version "0.9.2" --header-size 0x400 --pad-header --slot-size 0x100000 --max-sectors 32 sfw_092.bin sfw092.bin
- Follow the instructions in the Deploy software - SFW section to deploy the
sfw092.binimage to the iMX RT1176 kit. This first version of the firmware must be deployed locally. Once deployed new versions can be deployed using AWS IoT.
Deploy the software
Use pre-built software
Before deploying software to the target, it must be built. Instructions for building is available in the Build the software section above, but since SBL doesn’t have to be configured to be used with SFW and/or AWS IoT we have provided a pre-built image. You can download it from the link below.
https://sw.embeddedartists.com/imxrt/ea_rt1176_ota_sbl.zip
The SFW software must however be configured to be used for your specific AWS account so a pre-built image cannot be provided.
SBL
We will use MCUXpresso to program the flash with the SBL image. You should have followed the instructions in the document iMX RT Developer’s Kit Program Development Guide to install MCUXpresso as well as the SDK for Embedded Artists iMX RT1176 Developer’s Kit.
Import hello world demo
The first step is to import an existing code example that has been setup for the iMX RT1176 Developer’s Kit.
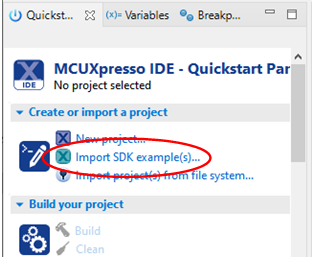
Click on Import SDK example in the QuickStart Panel as shown in the figure below.
Select the eaimxrt1176 SDK from the Import Wizard and then click the Next button as shown in the figure below.

Go to demo_apps and select hello_world_demo_cm7 as shown in the figure below and then click Finish.

GUI Flash Tool
Once the hello world application is imported and built you can use the GUI Flash tool to program the board with SBL.
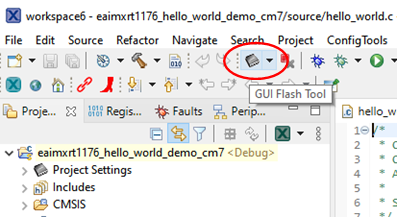
Click on the GUI Flash Tool icon in the toolbar as shown in the figure below.
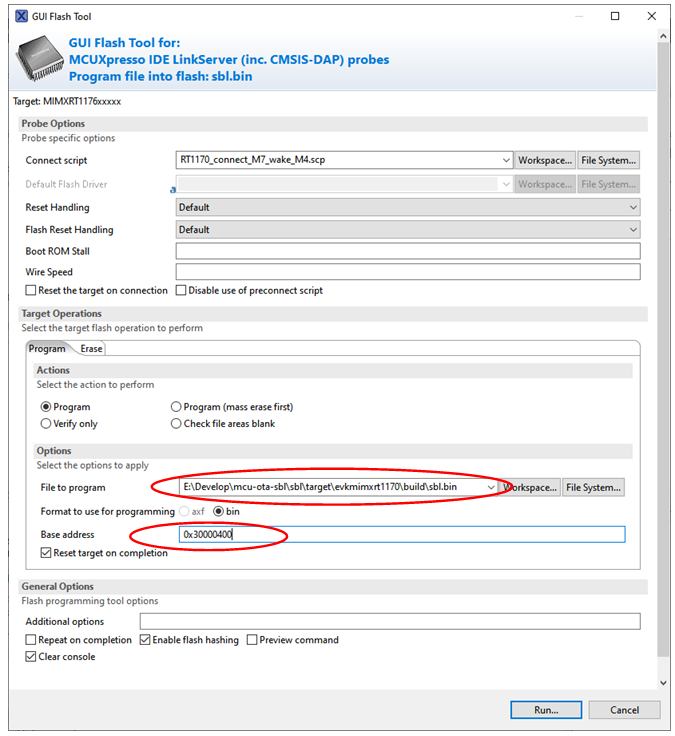
This will open up the GUI Flash tool dialog window as shown in the figure above. In the Target Operations → Program section click on the File System button and then navigate to the built sbl.bin file (use either the pre-built as described in the Use pre-built software section or the one you built by following instructions in the Secure Bootloader section above).
Change the base address to 0x30000400 and then click the Run button to program the board.
Reset the board and SBL will start. In the console you will see the output below (after a few seconds).
hello sbl.
Bootloader Version 1.1.0
Remap type: none

Unable to find bootable image
SFW
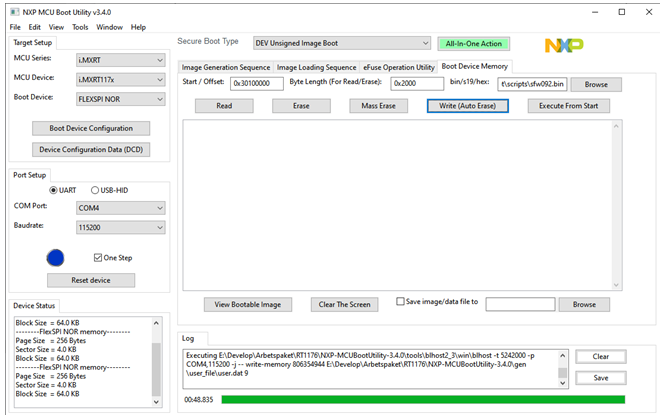
We will use the NXP MCU Boot Utility to download the SFW image to the board.
-
Download and install MCU Boot Utility from https://github.com/JayHeng/NXP-MCUBootUtility
-
Start the application and make sure i.MXRT117x is selected as MCU Device and FLEXSPI NOR as Boot Device. See top left part of the figure below.
-
Chose UART as interface towards the board and select the COM port connected to the board (in this example COM4 is used with baudrate 115200). Click the Connect button. See bottom left part of the figure below.
-
We are going to program the image to slot 1 which is available at an offset of
0x100000from the start of the flash address. In this case that is0x30100000. Set this address in the Start / Offset input box. Click the Browse button and select thesfw092.binfile created in section 3.2.5 above. -
Click the Write (Auto Erase) button to program the image
-
Once programmed reset the board and you will see output in the console similar to below (only first part of output is shown).
hello sbl.
Bootloader Version 1.1.0
Remap type: none

The image now in PRIMARY_SLOT slot

Bootloader chainload address offset: 0x100000
Reset_Handler address offset: 0x100400
Jumping to the image

hello sfw!
Current image verison: 0.9.2 -
When the application has started, initialized the network interface and established a connection to AWS IoT you will see the output below in the console.
Hello world1.
Hello world2.
54 25488 [iot_thread] State: WaitingForJob Received: 1 Queued: 0 Processed: 0 Dropped: 0 -
You can now continue with the instructions in the AWS OTA section of NXP’s documentation. More specifically you should create
sfw093.bin(a new version of SFW) as described in section 7.3.1.4, upload the file as described in section 7.3.1.5 – Upload new image to S3 bucket, and then create an OTA job as described in section 7.3.1.6 – Create OTA Job.