Standalone download
This section describes how to download an application to the iMX RT board without using the IDE. Note that this section does not describe how to create the application code (create the application, compile and link it). It is assumed that a binary file exist that represent the application program.
As a reminder, there are two basic methods for program download.
-
ISP over USB Program Download ISP is short for In-System Programming. The i.MX RT MCU contains a bootloader in ROM that can be enabled by pressing the ISP Enable push-button.
An application (MCUXpresso Secure Provisioning Tools) provided by NXP is needed on the PC for downloading and flashing the application code. It is this method that will be described in this chapter.
- This method of programming is useful during production
- The MCUXpresso Secure Provisioning Tools application is needed to generate an authenticated or encrypted image of the application.
- Technically it is possible to program/flash without a JTAG probe (via NXP's MCUXpresso Secure Provisioning Tools application), but it is strongly recommended to use the proper tool for debugging - i.e., use a JTAG probe!
-
SWD/JTAG Debug Interface Using this method, the application can be downloaded to internal SRAM, to external SDRAM or external flash.
This method is tightly integrated with the Integrated Development Environment (IDE) used. Specific scripts (and sometimes flash programming algorithms) must exist for the used IDE. Currently such scripts and drivers exist for Keil uVision/MDK, NXP MCUXpresso and IAR Embedded Workbench. For other IDEs, check supported functions.
- There are many different SWD/JTAG interfaces on the market. NXP has created the low-cost MCU-Link and LPC-LINK2, Keil has ULINK2/ULINKpro, Segger has J-LINK, etc.
Install the Required Software
Download MCUXpresso Secure Provisioning Tool from NXP's website. It can be found under the Tools & Software tab for each MCU or directly here. The tool is available for Windows, MacOS and Linux but this document only covers the Windows use case. Patching and using the MacOS and Linux versions should be very similar with only paths and file names varying.
The default installation location is c:\nxp\MCUX_Provi_v8\ which will be referred to as <sectool_dir> from now on.
Prepare the Program to Flash
A program can be setup to run directly in external nor flash, in internal SRAM or in (external) SDRAM and the project must be modified accordingly. This is described in detail in section 6.2 RT10xx/RT116x/RT117x Device Workflow of the User Manual - MCUXpresso Secure Provisioning Tools that comes with the installation of the tool (filename: MCUXpresso Secure Provisioning Tool.pdf) or it can be viewed here: https://www.nxp.com/webapp/Download?colCode=MCUXSPTUG
As an example, this is what was needed to prepare the led_blinky demo application.
-
Open the project
<install_dir>\eaimxrt1176_sdk_2_15_000\boards\evkbmimxrt1170\demo_apps\led_blinky\cm7\mdk\iled_blinky_cm7.uvprojx -
Select the
sdram_debugtarget -
Open Project → Options → Output and make sure that Create HEX File is selected
-
Switch to the Linker tab and click Edit to open the scatter file in the background
-
Close the dialog with the OK button (to save the change made in step 3)
-
Modify the following lines in the scatter file:
#define m_interrupts_start             0x00000000
#define m_interrupts_size              0x00000400

#define m_text_start                   0x00000400
#define m_text_size                    0x0003FC00

#define m_data_start                   0x80000000
#define m_data_size                    0x01000000
to look like this:
#define m_interrupts_start             0x80002000
#define m_interrupts_size              0x00000400

#define m_text_start                   0x80002400
#define m_text_size                    0x0001DC00

#define m_data_start                   0x80020000
#define m_data_size 0x00DE0000 -
Save the file
-
Press F7 or Project → Build Target
-
There should now be a hex file here:
<install_dir>\eaimxrt1176_sdk_2_15_000\boards\evkbmimxrt1170\demo_apps\led_blinky\cm7\mdk\sdram_debug\iled_blinky_cm7.hex
Booting an Unsigned Image
Unsigned image is typically used for development. It's recommended to start with this boot type before working with secured images to verify that the executable image works properly.
The first step is to convert the prepared application into a bootable image.
-
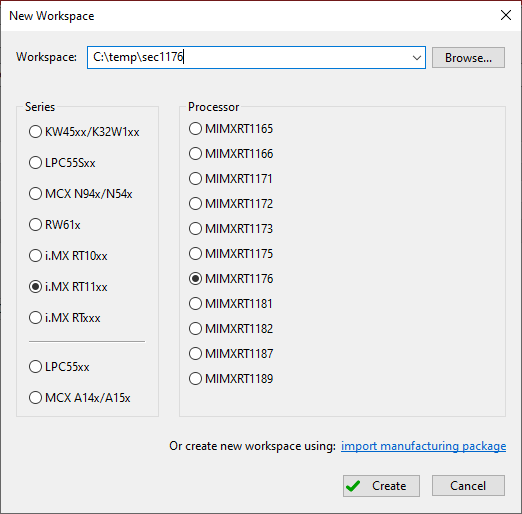
Start with a new workspace, File → New Workspace...
-
Select a location for the workspace and which processor to use. Click Create.
-
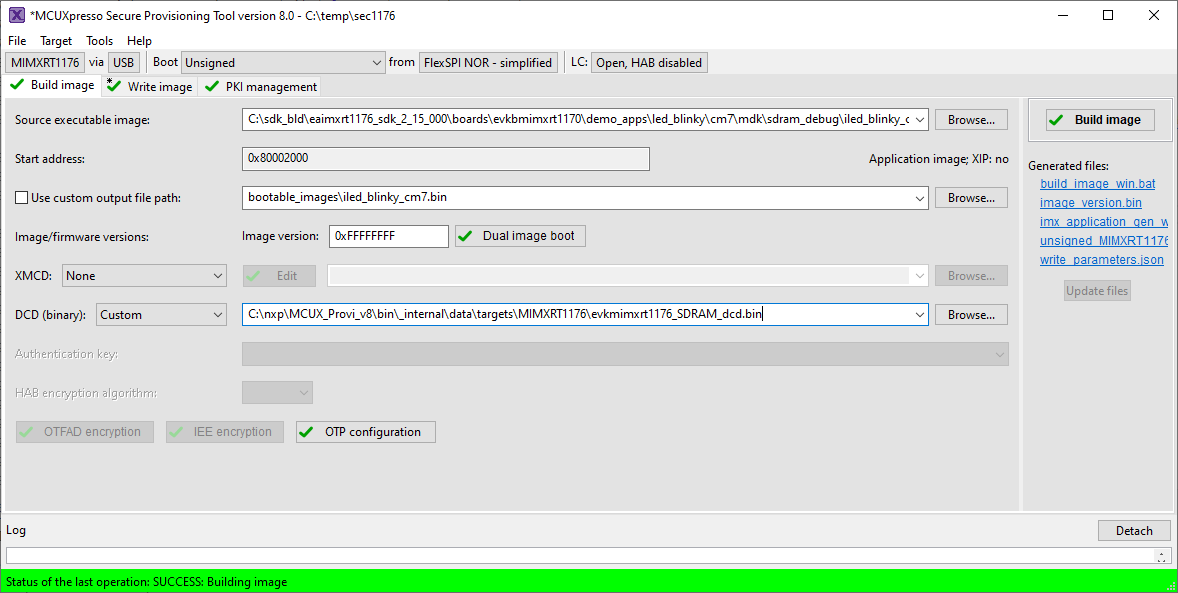
Make sure that Boot Type is Unsigned
-
Set Boot Device to
FlexSPI NOR - simplifiedand use the predefined templateIS25LPxxxA_IS25WPxxxAfor iMX RT11xx targets. For the iMX RT1064 use the same Boot Device but change the template toW25Q32JV. Press Apply to load the settings and then close the dialog. -
Switch to the Build Image tab
-
Select the Source executable image that was prepared in the previous section, i.e.
iled_blinky_cm7.hex -
If (and only if) the application uses SDRAM, select the Custom option for DCD (binary) and pick the correct file in the dropdown list. It should have the version number and MCU name in the file name, for example
C:\nxp\MCUX_Provi_v8\bin\_internal\data\targets\MIMXRT1176\evkmimxrt1176_SDRAM_dcd.bin -
Click Build Image
To write the image:
-
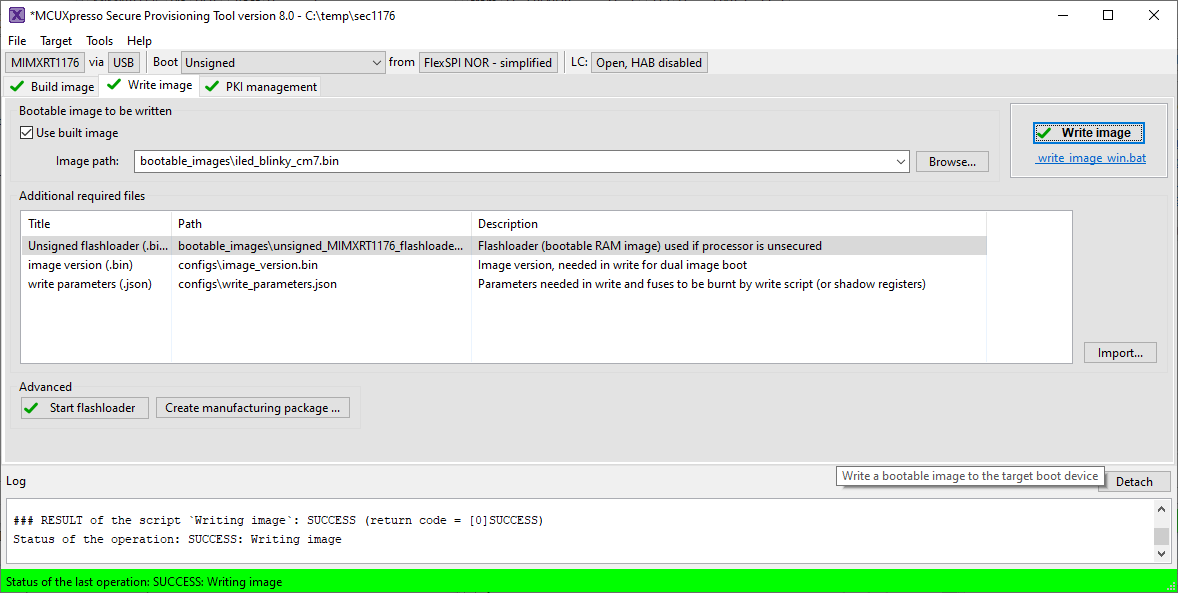
Switch to the Write Image tab
-
Make sure that the Use built image option is selected
-
Connect the hardware to the PC using micro-B to A USB cables in both J26 and J29 connectors
-
Put the hardware in ISP mode:
- Push and hold down the ISP enable button
- Press the Reset button
- Release the Reset button
- Wait 1 seconds
- Release the ISP enable button
-
Press the Write Image button
-
When finished, press the Reset button on the hardware to run the program
Booting an Authenticated or Encrypted Image
The MCUXpresso Secure Provisioning Tools support authenticated (signed) and encrypted (signed+encrypted) images. This is described in detail in the User Manual for the tool. A couple of very important notes:
- Encrypted images cannot be used for applications that execute directly in the flash (XiP).
- Burning the fuses in the processor is an irreversible operation. If the fuses are burnt and the key is lost, then there is no way to burn anything again on that hardware so make sure to backup the (generated) keys BEFORE burning them to the hardware.
- If the instructions mention setting the SW7 DIP to the board to 0001 it means putting the board into ISP mode. This is done on the Developers Kit by:
- Push and hold down the ISP enable button
- Press the Reset button
- Release the Reset button
- Wait 1 seconds
- Release the ISP enable button
More Information
NXP has a Getting Started video for Secure Provisioning Tool. The page also have links to the community forum for the tool.