Terminal application setup
This section contains information about the terminal connection that exist on the uCOM Carrier Board, and how to setup a terminal application on the PC. The terminal connection connects UART1 of the i.MX RT to a virtual COM port over the USB interface available on J29. The terminal is commonly used during program development.
UART-to-USB Bridge
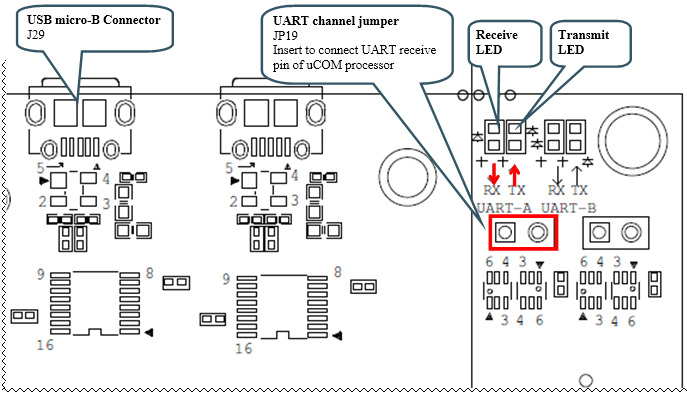
The UART-to-USB bridge chip (FT230XS-R from FTDI) on the uCOM Carrier Board connects to UART channel #1 on the i.MX RT. It exists to simplify connection to a PC because serial ports are not so common anymore, especially not on laptops. The USB port also offers the possibility to power the board.
There are two LEDs, transmit from the board (LED9) and receive to the board (LED8), that signal communication activity.
See picture below for locating relevant components.
Terminal Application on the PC
Begin by connecting the micro-B USB connector to J29, see picture above. Connect the other end of the USB cable to the PC. The PC will typically immediately begin installing drivers automatically for the UART-to-USB bridge that creates a Virtual COM port, if they are not already installed. If you have problems the drivers can be downloaded from the links below:
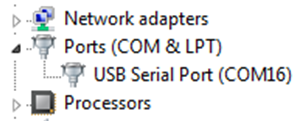
When the driver has been installed, a new COM port will be listed under Ports in the Device Manager as shown in the figure below. Please note that the actual port number will most likely be different on your computer.
The next step is to open a terminal application and attached it to the Virtual COM port that has just been created. The baud rate should be 115200.
Some development environments/IDEs have a built-in terminal application that can be used. Sometimes it is better to have a terminal application with more features. For increased flexibility, we recommend using any of the two alternative terminal applications presented in the following sub-sections.
Tera Term Terminal Emulation Application
We recommend that you use Tera Term which can be downloaded and installed from either of the links below.
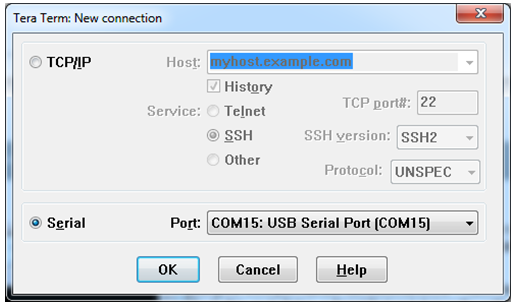
Launch Tera Term. The first time it launches, it will show you the following dialog. Select the serial option. Assuming the USB cable is connected to the uCOM Carrier Board, there should be a COM port automatically populated in the list.
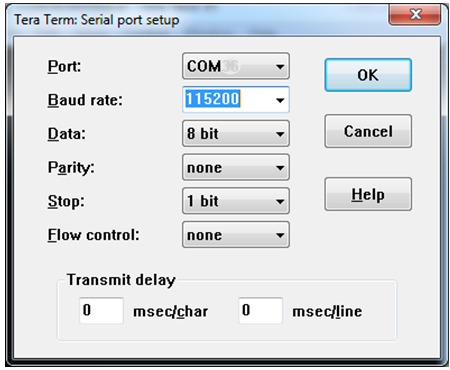
Configure the serial port settings (using the COM port number identified earlier) to 115200 baud rate, 8 data bits, no parity and 1 stop bit. To do this, go to Setup → Serial Port and change the settings.
Verify that the connection is open. If connected, Tera Term will show something like below in its title bar.

PuTTY terminal emulation application
Alternatively, you can use PuTTY. It is another commonly used terminal emulation application. PuTTY can be downloaded and installed from the link below.
http://www.chiark.greenend.org.uk/~sgtatham/putty/download.html
Launch PuTTY by either double clicking on the *.exe file you downloaded or from the Start menu, depending on the type of download you selected.
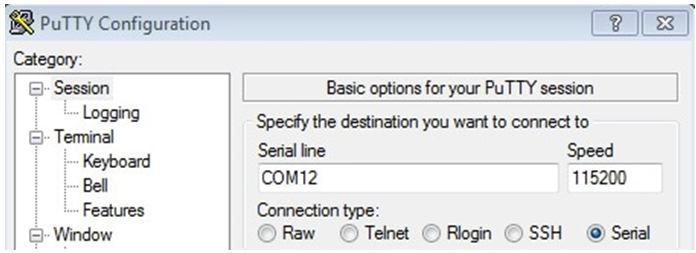
In the window that launches, select the Serial radio button and enter the COM port number that you determined earlier. Also enter the baud rate, in this case 115200.
Click Open to open the serial connection. Assuming the FTDI cable is connected, and you entered the correct COM port, the terminal window will open. If the configuration is not correct, PuTTY will alert you.