Mender
The mender client was ported to and tested with the distributions ea-5.4.24 and ea-4.14.98. Newer versions might need updated instructions.
Introduction
Over-the-air (OTA) updates, also sometimes known as remote updates, is a solution for remotely updating the software on a device. Remotely meaning that you don’t need physical access to the device when updating its software.
Mender is based on a client/server architecture where the client runs on the device and is responsible for regularly polling a server for new software updates. New software is built in a build system, such as Yocto, and packaged into files known as Mender artifacts. These artifacts are uploaded to the server when the new software should be deployed to the devices.

Mender is considered secure since it among other things;
- Communicates over an encrypted channel.
- The client verifies the server’s identity using certificates.
- The device must be authorized before accepted by the server.
- Has the option to use signed artifacts, that is, the artifact is signed using a private key and then validated on the device using a public key.
- No ports need to be open on the device since the device initiates all communication.
Mender is considered robust since it;
-
Use a dual redundant update scheme. Updated software will first be written to an inactive partition of the file system. First after a successful boot and verification will the inactive partition be set to active.
More information is available here: https://docs.mender.io/2.4/architecture/overview#robust-updates
-
A separate partition is used for persistent data that should be kept unmodified between updates.
More information about the partition layout is available here: https://docs.mender.io/2.4/devices/general-system-requirements#partition-layout
You should use the information in this chapter in combination with Mender’s documentation. This chapter will by no means cover all aspects of Mender.
https://docs.mender.io/overview
Get started with pre-built image
There are pre-built images with Mender support available at https://sw.embeddedartists.com. These are configured to use Hosted mender server, that is, you need to create an account at https://hosted.mender.io/ui/#/signup to be able to fully test the Mender functionality. At the time of writing this document it was possible to create a trial account which was free for 12 months and limited to 10 devices.
Download UUU bundle and program device
Follow these instructions to program a device with an image that has Mender support.
- Go to https://sw.embeddedartists.com and then to the section for the (u)COM board you are using. There will be a file with _mender in the name such as uuu_imx8mm_ucom_mender_5.4.24.zip for the iMX8M Mini uCOM board.
- Unpack this file and then program your device using the mender.uuu script. See the UUU section in the document Working with Yocto for details about how to use UUU (Universal Update Utility).
uuu mender.uuu - Boot the board and login after it has been programmed. Verify that mender is available by checking the version of the mender client. You can also check which version of the software / artifact that is used.
mender --version2.4.1 runtime: go1.14.7mender -show-artifactrelease-1.0
Get token associated with the Mender account
When you have signed up for a Mender account and logged in you click on your username at the top right part of the page and then My organization as shown in the figure below.
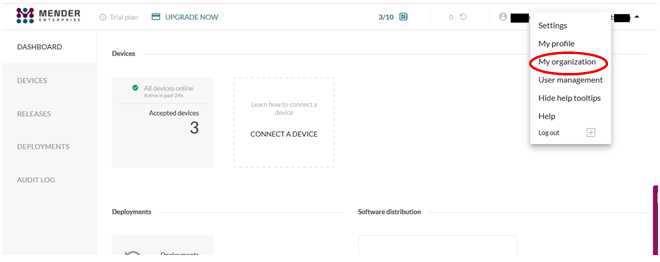
You will now see your organization token and can click on the COPY TO CLIPBOARD button as shown in the figure below to copy it.

Write token to the configuration file
For the device to be able to authenticate with the Mender server the organization token, copied in the previous section, must be written to Mender’s configuration file on the device.
- Boot the device and login.
- Open the configuration file.
nano /etc/mender/mender.conf - The parameter TenantToken will have a default (invalid) value of
replace-with-token. Replace this string with your organization token."TenantToken": "replace-with-token", - Exit the editor with CTRL+X. Click Y to save the changes.
- Now restart the mender client to reload the configuration file.
systemctl restart mender-client
Accept the device
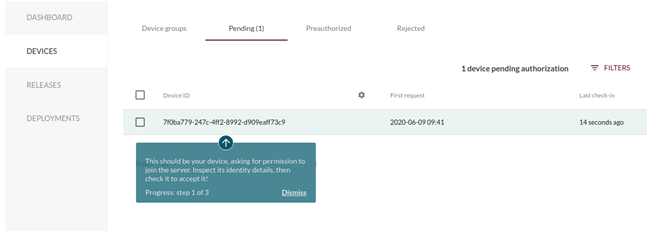
With a valid token the device should now show up under Pending devices on the server as shown in the figure below. You need to accept this device.
Deploy a system update
Within the UUU bundle zip file there is an artifact file (release-1.1.mender) where git tools has been added to the file system.
-
Verify that you don’t currently have git tools on your device.
git-sh: git: command not found -
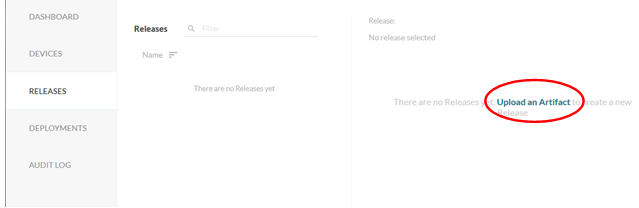
On the Mender server go to the RELEASES tab and then click on Upload an Artifact as shown in the figure below.
-
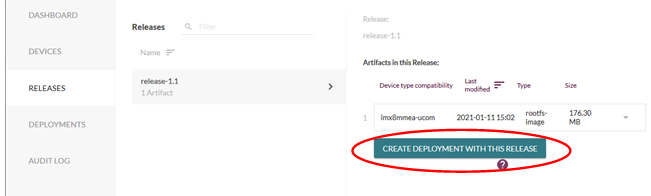
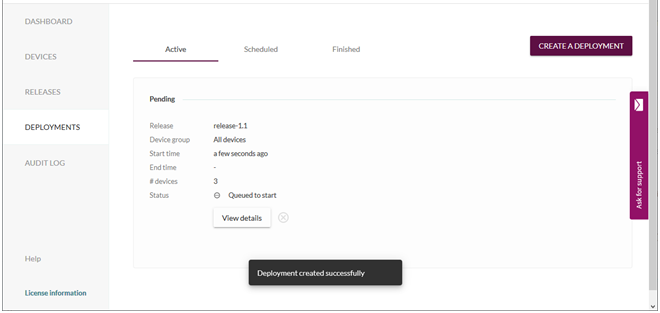
Once uploaded, create a new deployment as shown in the figure below.
-
Select All devices in the dialog and then click Next.
-
Use default values on the next dialog and then click Next.
-
Click Create on the last dialog window and the deployment will be created.
-
Since the default polling interval is 30 minutes it can take a while before the client is updated. You can monitor the progress as shown in the figure below. It is possible to force an update check by running
mender check-updateon the device.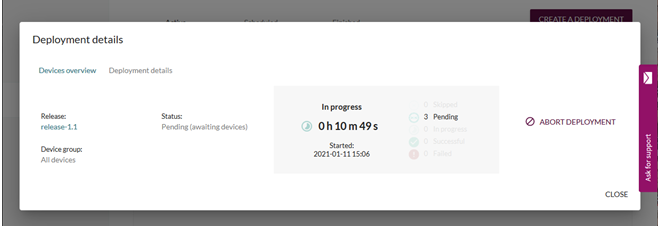
Verify update
When the device has been successfully updated it will reboot.
- Login to the console.
- Verify that git is now available.
git --versiongit version 2.23.1 - You can also verify which release that is used.
mender -show-artifactrelease-1.1
Build a distribution with Mender support
The instructions in this section assumes that you already have knowledge about how to build Yocto distributions as described in Working with Yocto.
Supported (u)COM boards
The following (u)COM boards currently have Mender support.
| Board | Machine name |
|---|---|
| iMX8M Mini uCOM | imx8mmea-ucom |
| iMX8M Nano uCOM | imx8mnea-ucom |
| iMX8M Quad COM | imx8mqea-com |
Branches with Mender support
The following ea-yocto-base branches have Mender support. An ea-yocto-base branch corresponds to a specific distribution where the branch name is based on the Linux kernel version used in that distribution. The table below also specifies which Mender client version that will be built on a specific branch.
| Branch | Mender client version |
|---|---|
ea-5.4.24 | 2.4.1 |
ea-4.14.98 | 1.7.1 |
Initialize repository
The instructions are basically identical with what is already described in the Download Yocto recipes section. The only thing that needs to be changed is the repo init command where the ea-mender.xml manifest file should be chosen using the -m option.
The example below shows how this looks like when using the ea-5.4.24 branch.
repo init -u https://github.com/embeddedartists/ea-yocto-base -b ea-5.4.24 -m ea-mender.xml
Initialize build
When initializing the build the ea-setup-mender.sh script should be used instead of the ea-setup-release.sh script.
The example below shows how this looks like when initializing a build for the iMX8M Mini uCOM board.
DISTRO=fsl-imx-wayland MACHINE=imx8mmea-ucom source ea-setup-mender.sh -b build_dir
Configure Mender
Mender is mostly configured via the build_dir/conf/local.conf file. This file has been prepared with default values that can be used to test and evaluate Mender. One thing that hasn’t been enabled is however which kind of Mender server to use. If you start evaluating with the demo server you then have to uncomment the MENDER_DEMO_HOST_IP_ADDRESS variable and set it to the IP address of the demo server. In the example below this variable has been set to 192.168.1.11. See the Mender demo server section for more information about the demo server.
MENDER_DEMO_HOST_IP_ADDRESS = "192.168.1.11"
Another important variable you need to be aware of is MENDER_ARTIFACT_NAME. By default, it is set to release-1. This is a name that must be unique for each deployment, that is, each update of the device. This is what the device will report that it is running.
https://docs.mender.io/system-updates-yocto-project/variables#mender_artifact_name
Build the image
An image, such as ea-image-base, can now be built using bitbake.
bitbake ea-image-base
Program / update the device
When the build has finished, two important files will be available (in build_dir/tmp/deploy/images/<machine name>/) that can be used to program or update the device.
| File type | Example file |
|---|---|
sdimg | This file will contain the complete disk image and is used the first time when you program a device that doesn’t have Mender support. As an example the file will have the following name for the iMX8M Mini uCOM board: ea-image-base-imx8mmea-ucom.sdimg |
mender | This is the Mender artifact file. This is the file you can upload to a Mender server and then deploy to devices. As an example the file will have the following name for the iMX8M Mini uCOM board: ea-image-base-imx8mmea-ucom.mender |
To program the sdimg file use UUU (Universal Update Utility). Use the pre-built bundle found at https://sw.embeddedartists.com and just replace the sdimg file in that bundle, see the Download UUU bundle and program device section above.
Mender demo server
As described in the Configure Mender section you can start to test Mender by using a demo server. This server is only appropriate for testing and experimenting, not for production. It is out-of-scope of this document to describe how to install the demo server, but there are detailed instructions in Mender’s documentation. At the time of writing this document we tested version 2.4.1 of the demo server and it works with both version 1.7.1 and 2.4.1 of the Mender clients.
https://docs.mender.io/2.4/getting-started/on-premise-installation/create-a-test-environment
Mender hosted server
Mender provides a service where they host and maintain production ready servers. At the time of writing this document it was possible to create a trial account which was free for 12 months and limited to 10 devices.
https://hosted.mender.io/ui/#/signup
To be able to use a hosted server you need to do a couple of changes in the build_dir/conf/local.conf file.
- If you have previously built for demo server you need to comment out / remove the
MENDER_DEMO_HOST_IP_ADDRESSvariable. - Uncomment
MENDER_SERVER_URL = "https://hosted.mender.io" - Uncomment
MENDER_TENANT_TOKENand set it to the token you get from your Mender account. You get this by logging in to hosted.mender.io, click on your user-name (top-right) and then select My organization.
You also need to build for production which means that the demo layer in Yocto must be removed.
In your build directory (build_dir) run bitbake-layers remove as below.
bitbake-layers remove-layer meta-mender-demo
Official documentation about removing the demo layer:
https://docs.mender.io/system-updates-yocto-project/build-for-production#remove-demo-layer
Make sure the mender-client is re-built by removing any cached files.
$ bitbake -c cleansstate mender-client
Now you can build a new image which will be configured to use a hosted server.
$ bitbake ea-image-base
On-premise server
It is also possible to host your own server. Requirements and instructions are available in the official documentation.
https://docs.mender.io/2.4/administration/production-installation
Local update of the device
It is possible to do local updates of the device, that is, updates where the server is not involved. This could, for example, be used if the device doesn’t have network connectivity. This is called standalone deployment.
https://docs.mender.io/artifact-creation/standalone-deployment
Sign and verify the artifact file
To add another level of security, artifacts can be signed and the client can be configured to only accept signed artifacts. This means that the Mender client will verify that the signature is valid before installing the artifact.
This was tested by
-
Generating RSA keys as described here: https://docs.mender.io/2.4/artifacts/signing-and-verification#rsa
-
Configuring the mender-client to only accept signed artifacts by specifying the
MENDER_ARTIFACT_VERIFY_KEYvariable inbuild-dir/conf/local.conf. In the example below the public key is available in<home directory of the user>/builds/mender/.MENDER_ARTIFACT_VERIFY_KEY = "${HOME}/builds/mender/public.key" -
Build a new image and update the device. After the device has been updated it will only accept signed artifacts.
-
Downloading the mender-artifact tool: https://docs.mender.io/2.4/downloads#mender-artifact-tool
-
Sign an artifact using the created private key.
mender-artifact sign ea-image-base-imx8mmea-ucom.mender -k private.key -o artifact-signed.mender -
Upload the signed artifact to the server.
noteIn the above instructions the
MENDER_ARTIFACT_VERIFY_KEYvariable is set inlocal.conf. Mender, however, recommends that the public key is included in a build by using a Yocto layer: https://docs.mender.io/2.4/artifacts/yocto-project/building-for-production#artifact-signing-and-verification-keys
Full official documentation: https://docs.mender.io/2.4/artifacts/signing-and-verification
Is the bootloader updated?
In a default setup of Mender an artifact will update all the content of the root file system. For the iMX based processors the bootloader needs to be put at a fixed offset on the storage device, the eMMC in our case. This means that the bootloader is not part of the root file system and will therefore not be updated. A way to solve this could be to use Update Modules as described in the link below. At the time of writing this document the use of update modules has not been tested.
https://docs.mender.io/2.4/devices/update-modules
Bootloader in sdimg file
Although the bootloader is not part of the artifact file, as described in the previous section, it will be part of the sdimg file. Please remember that the sdimg file is only used when initially programming a device and not when updating a device in the field.
One important thing to note is however that the default setup of the (u)COM boards is to use the eMMC boot partition 1 as the bootable area of the eMMC. To be able to use the bootloader in the sdimg file we must instead configure the eMMC to use the user-area as bootable partition. Read the eMMC guide if you want to know more about how to use eMMC devices.
The eMMC can be configured from the U-Boot by using the mmc partconf command which is described as below in the U-Boot documentation.
mmc partconf dev [boot_ack boot_partition partition_access]
 - Show or change the bits of the PARTITION_CONFIG field of the specified device
For the iMX8M Mini uCOM board it would look like this.
mmc partconf 2 1 7 0
The mmc partconf command is run from the uuu script available in the pre-built image as described in the Get started with pre-built image section above.