Wi-Fi: HostAP
Previous sections have described how to connect to a wireless network as a client. In this section we will instead create our own network that other clients can connect to. The way to do this depends on which M.2 module is being used, so the instructions have been split into separate chapters below (Infineon/Cypress and NXP).
The chapters about connecting with a client and using iperf3 are the same for all modules.
Setup for Infineon/Cypress based Chipsets
For these modules we use hostapd (host access point daemon) which enables a network interface card to act as an access point and authentication server. We will also use udhcpd (a DHCP daemon) to assign IP addresses to connecting clients.
The code below will be for the 1XA module so replace 1XA with your module. The instructions will result in an unprotected wireless network called test and the client will be assigned an IP number in the 192.168.5.100 to 192.168.5.150 range.
switch_module.sh 1XA
/opt/ea/autostart_hostapd.sh enable
reboot
The new wireless network will automatically be available after the reboot.
To stop using hostapd and go back:
/opt/ea/autostart_hostapd.sh disable
switch_module.sh 1XA
reboot
What happens in the background?
- The
/etc/hostapd.conffile is modified to use wlan1 as network interface. You can modify the ssid=test line in this file to set a different network name. - The
/etc/udhcpd.conffile is copied and modified to use wlan1 as network interface and to change to the wanted IP range - An
hostapd@wlan1systemdservice is enabled (will start after a reboot) that will handle starting ofhostapdas well asudhcpd
Setup for NXP based Chipsets
For these modules we use hostapd (host access point daemon) which enables a network interface card to act as an access point and authentication server. We will also use udhcpd (a DHCP daemon) to assign IP addresses to connecting clients.
The code below will be for the 1ZM module so replace 1ZM with your module. The instructions will result in an unprotected wireless network called test and the client will be assigned an IP number in the 192.168.5.100 to 192.168.5.150 range.
switch_module.sh 1ZM
/opt/ea/autostart_hostapd.sh enable
reboot
The new wireless network will automatically be available after the reboot.
To stop using hostapd and go back:
/opt/ea/autostart_hostapd.sh disable
switch_module.sh 1ZM
reboot
What happens in the background?
- The
/etc/hostapd.conffile is modified to use uap0 as network interface. You can modify the ssid=test line in this file to set a different network name. - The
/etc/udhcpd.conffile is copied and modified to use uap0 as network interface and to change to the wanted IP range - An
hostapd@uap0systemdservice is enabled (will start after a reboot) that will handle starting ofhostapdas well asudhcpd
Connecting with a client
Use a phone/laptop/tablet to search for available networks and the "test"/"Test_SSID" (or the ssid you entered above) network should appear. It might look like this on a phone:
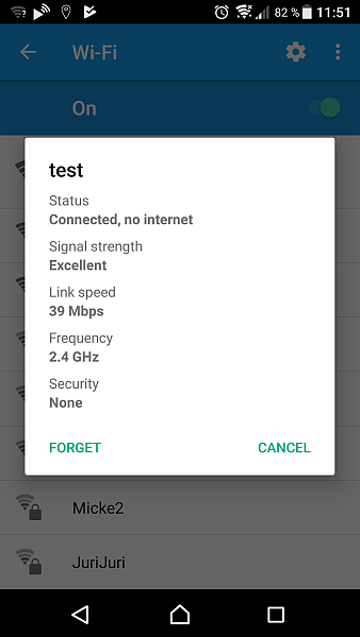
Note that the status "Connected, no internet" appears as there is no route for the traffic from the phone to Internet. It is possible (but out of scope for this document) to route the traffic to, for example, a wired network connection on iMX (u)COM Boards with wired network interface(s).
Some phone models/version show the assigned IP number in this dialog, but the example phone does not. If the default settings are used, then the assigned IP number will be 192.168.5.100.
To check which IP addresses have been assigned run the following command (not always working):
dumpleases
Mac Address       IP Address      Host Name           Expires in
aa:5f:1b:40:22:ad 192.168.1.100   Samsung-Galaxy-S7   expired
A bit more information can be found in the system log (here the first 4 lines come when connecting and the last line when the client leaves):
grep -E "hostapd|udhcpd" /var/log/messages
Oct 31 13:41:52 imx8mmea-ucom daemon.info hostapd: wlan1: STA aa:5f:1b:40:22:ad IEEE 802.11: associated
Oct 31 13:41:52 imx8mmea-ucom daemon.info hostapd: wlan1: STA aa:5f:1b:40:22:ad RADIUS: starting accounting session 7A3D9F4430B5BFA0
Oct 31 13:41:52 imx8mmea-ucom daemon.err udhcpd[3458]: sending OFFER of 192.168.5.100
Oct 31 13:41:53 imx8mmea-ucom daemon.err udhcpd[3458]: sending ACK to 192.168.5.100
Oct 31 13:46:03 imx8mmea-ucom daemon.info hostapd: wlan1: STA ac:5f:3e:40:1e:ad IEEE 802.11: disassociated
One more way to get information about a connected client:
hostapd_cli all_sta
Selected interface 'wlan1'
aa:5f:1b:40:22:ad
flags=[AUTH][ASSOC][AUTHORIZED]
aid=0
capability=0x0
listen_interval=0
supported_rates=
timeout_next=NULLFUNC POLL
rx_packets=1015
tx_packets=193
rx_bytes=62988
tx_bytes=37595
inactive_msec=5000
connected_time=216
The last few lines give some statistics for the connection.
Example - iperf3 on Android
In this example your phone/tablet must have iperf3 software (this example uses the free PingTools Network Utilities app for Android, https://play.google.com/store/apps/details?id=ua.com.streamsoft.pingtools).
Start the iperf3 server on the target:
iperf3 -s
-----------------------------------------------------------
Server listening on 5201
-----------------------------------------------------------
Start the app on the phone. It will look like this the first time:
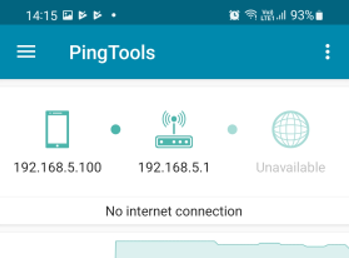
Click the menu button in the top left corner and select the iPerf alternative. Enter 192.168.5.1 in the address field and press start. The result will be presented after 5 seconds:
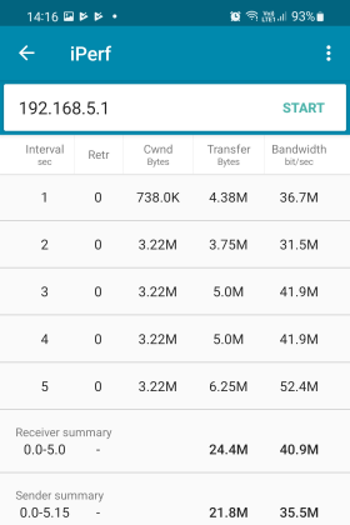
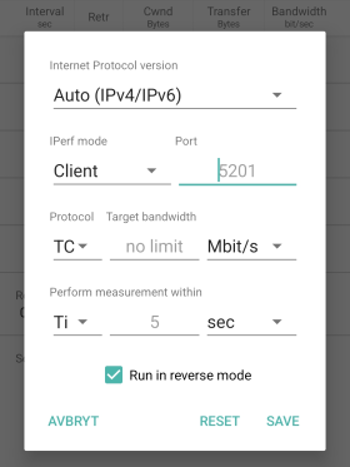
Press the start button again to rerun the test or click the menu in the top right corner and select Settings to get a menu like this where you can select test duration and select to run in reverse mode:
The iperf3 server can be stopped with Ctrl+C on the target.
Where to go from here?
-
Adding a web server to provide a user interface to the services running on the target. There are several web servers available in Yocto, each with their strengths and weaknesses. One interesting feature is a "Captive Portal" which Wikipedia describes as
a web page accessed with a web browser that is displayed to newly connected users of a Wi-Fi network before they are granted broader access to network resources.
There are several guides on how to set up a Captive Portal available on the Internet depending on your choice of web server.
-
Look into using iptables (available on the ea-image-base file system) to set up some firewall rules to protect the system from malicious attacks.