Develop with C
Introduction
When developing applications for Linux you have a large selection of programming languages, editors, development environments, libraries and toolchains to choose from. This guide will provide you with instructions for how to get started with application development using the C programming language.
This guide is not a course in C programming or Embedded Linux application development. Instead, it will guide you in setting up the tools that exist for building your first Hello world application.
If you have never worked with Embedded Linux a recommended course is bootlin’s Embedded Linux training. The slides are available for download on their site:
https://bootlin.com/training/embedded-linux/
Getting started
The instructions in this section have been tested on a virtual machine running lubuntu 16.04.
If you are an experienced Linux user it shouldn’t be a problem using another Linux distribution with the instructions below as a guideline.
Install toolchain
To be able to build an application that will run on Embedded Artists iMX based COM boards a toolchain is needed. The toolchain contains cross compiler, linker, and needed libraries. The steps below show one way to build it, for an alternate way of building a toolchain see Improved Toolchain.
The toolchain can be built in Yocto using the meta-toolchain image.
bitbake meta-toolchain
The build will result in a file located at <build directory>/tmp/deploy/sdk. The exact name of the file depends on several parameters, but in our example, it is called:
fsl-imx-fb-glibc-x86_64-meta-toolchain-cortexa9hf-vfp-neon-toolchain-4.1.15-1.2.0.sh
| Part of file name | Description |
|---|---|
fsl-imx-fb | The distribution (DISTRO parameter) used when initializing the build. |
x86_64 | Architecture of the host computer. In this example a 64-bit Intel x86 platform. |
4.1.15-1.2.0 | BSP version |
It is recommended to build this toolchain on your host computer where you will do the development, but if you have a 64-bit Intel x86 based host computer you can download a pre-built version from imx.embeddedartsits.com.
For iMX6 and iMX7 based boards (32-bit architecture)
wget sw.embeddedartists.com/common/fsl-imx-fb-glibc-x86_64-meta-toolchain-cortexa9hf-vfp-neon-toolchain-4.1.15-1.2.0.sh
For iMX8 based boards (64-bit architecture)
wget sw.embeddedartists.com/common/fsl-imx-wayland-glibc-x86_64-meta-toolchain-aarch64-5.4-zeus.sh
Install the toolchain. It is recommended to use the default settings (such as installation path) when installing. Replace <installation file> below with the name of the file you have downloaded or built.
chmod a+x <installation file>
sudo ./<installation file>
Hello world
To test the toolchain and make sure everything is working a simple Hello world application will be developed.
-
Open a terminal application on your host computer (the host computer in our example is lubuntu 16.04)
-
Setup the toolchain environment by running the source command below. A file was installed together with the toolchain that contains all environment variables needed to be setup. The instructions below use the default installation path.
source /opt/fsl-imx-fb/4.1.15-1.2.0/environment-setup-cortexa9hf-vfp-neon-poky-linux-gnueabi -
You can verify that the environment variables have been correctly setup by running the command below. This command shows the version of the GCC compiler.
$CC --versionarm-poky-linux-gnueabi-gcc (GCC) 5.2.0 -
Create the Hello world application using a text editor. In this example we are using
nano. Create the file and copy the content of the example below to that file.cd ~
mkdir hello_app
cd hello_app
nano hello.c#include <stdio.h>
int main(int argc, char **argv)
{
printf("Hello world\n");
return 0;
} -
Save the file (in nano use Ctrl+X followed by Y and Enter)
-
From the terminal where you setup the toolchain environment compile the application. We are giving the application the name
hellousing the–oargument to the compiler.$CC –o hello hello.c -
You will now have a file named
hello. Go to the next section for instructions of how to run this application on target.
Run the application on target
In the previous section the application was built. In this section the application will be copied to the target via a USB memory stick.
- Connect a USB memory stick to your host computer and copy the file
helloto that memory stick. No instructions are given here since it normally is only a drag-and-drop procedure. - Unmount the USB memory stick from your host computer and insert it into the developer’s kit. You should see output in the terminal connected to the target that looks similar to below.
usb 1-1.3: new high-speed USB device number 7 using ci_hdrc
usb-storage 1-1.3:1.0: USB Mass Storage device detected
scsi host4: usb-storage 1-1.3:1.0
scsi 4:0:0:0: Direct-Access     SanDisk  U3 Cruzer Micro  2.18 PQ: 0 ANSI: 2
scsi 4:0:0:1: CD-ROM            SanDisk  U3 Cruzer Micro  2.18 PQ: 0 ANSI: 2
sd 4:0:0:0: [sda] 8015505 512-byte logical blocks: (4.10 GB/3.82 GiB)
sd 4:0:0:0: [sda] Write Protect is off
sd 4:0:0:0: [sda] No Caching mode page found
sd 4:0:0:0: [sda] Assuming drive cache: write through
 sda: sda1
sd 4:0:0:0: [sda] Attached SCSI removable disk - The important part is the device name
sda1. Mount the USB memory stick.mount /dev/sda1 /mnt - Copy the application to the target. It is assumed that the file was copied to the root of the USB memory stick (in step 1 above). The
~character means that we are copying the file to the home directory.cp /mnt/hello ~ - Run the application
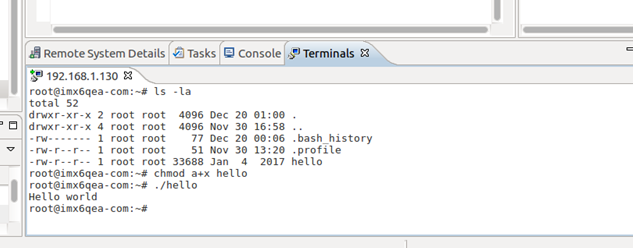
cd ~
./hello
Hello world - If you get a
permission deniedmessage instead ofHello worldadd execution permissions to the application and then run it againchmod a+x hello
Eclipse
Eclipse is a popular software development kit that can be used with many different programming languages. This chapter describes how to get started with Eclipse when developing C applications.
Install Eclipse
If you haven’t already got Eclipse on your host computer follow these instructions to install it. Please note that we are using lubuntu 16.04 when writing these instructions.
It is Eclipse 3.8.1 that was installed when writing these instructions. If you have another version of Eclipse there could be minor differences.
- Eclipse can be installed using
apt-get.sudo apt-get install eclipse - Answer
Yto any question. It takes a couple of minutes to install eclipse. - Since we are doing C development we also need to install CDT (C/C++ Development Tooling)
sudo apt-get install eclipse-cdt - To be able to connect to the target from within Eclipse we are going to use a plugin called Remote System Explorer.
sudo apt-get install eclipse-rse
Create and configure a project
Start Eclipse
Start Eclipse either from the menu (normally under Programming) or by writing eclipse in a terminal window.
eclipse &
You will be asked to select a workspace as shown in the figure below.
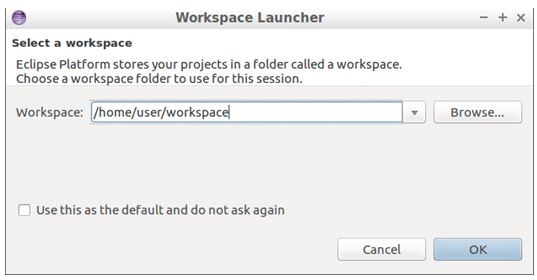
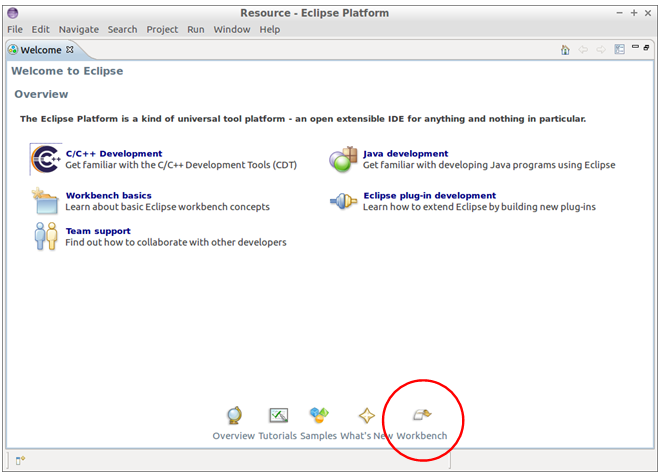
Click OK and if the workspace is new or has no projects you will be presented with the Welcome screen that can look as shown in the figure below. Click on the Workbench button at the bottom of the screen.
Create a project
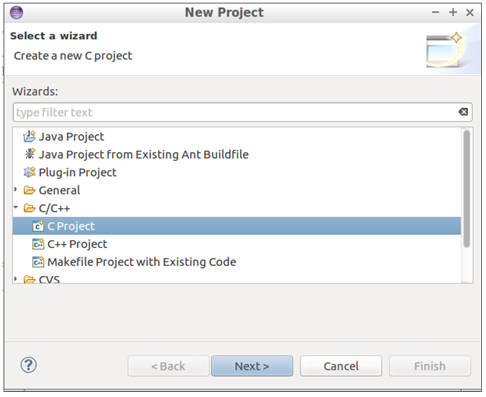
Create a new project by going to File → New → Project in the menu. Choose a C Project as shown in the figure below and then click Next.
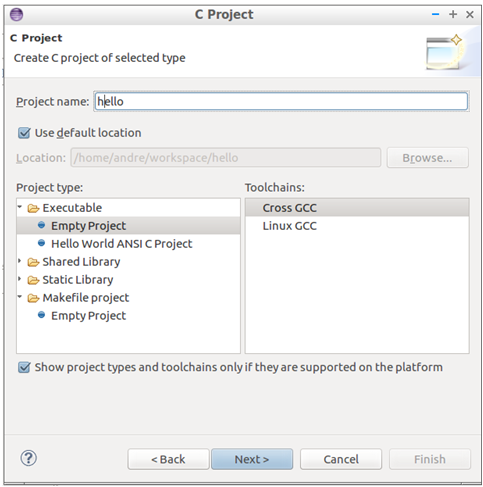
Enter a project name (hello in this example). Select project type as an Empty project and set toolchain to be Cross GCC as shown in the figure below.
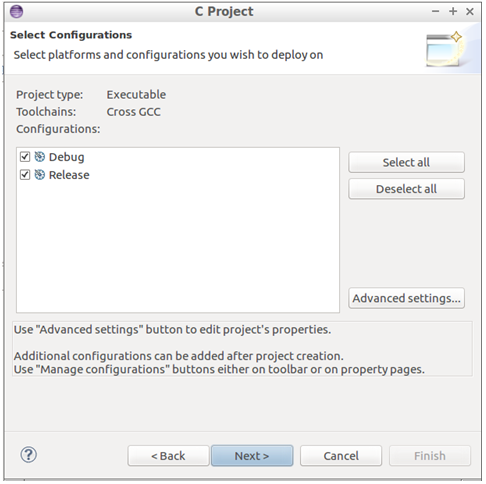
Click Next and then just use the default settings in the Select configurations dialog as shown in the figure below.
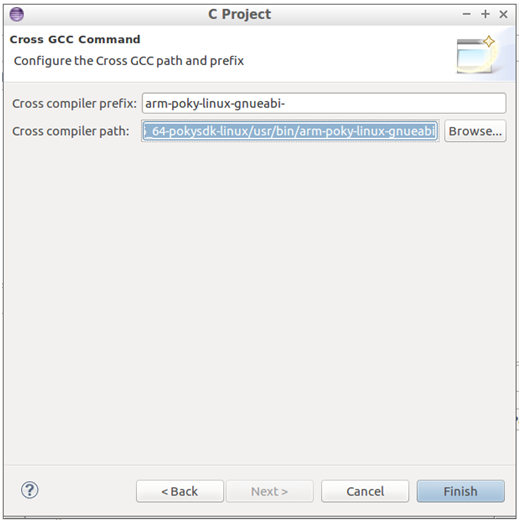
Click Next. Now it is time to set the path to the cross-compiler. Set the prefix to arm-poky-linux-gnueabi-. Set the path to (change if you have installed the toolchain elsewhere) /opt/fsl-imx-fb/4.1.15-1.2.0/sysroots/x86_64-pokysdk-linux/usr/bin/arm-poky-linux-gnueabi.
When you are done click the Finish button as shown in the figure below.
Create the application
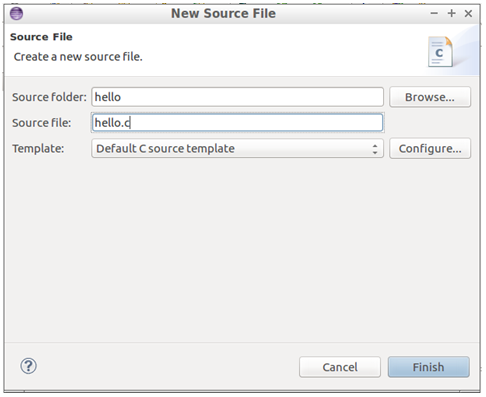
Create a new file by going to File → New → Source File in the menu. Enter a file name as shown in the figure below (hello.c in this example) and then click Finish.
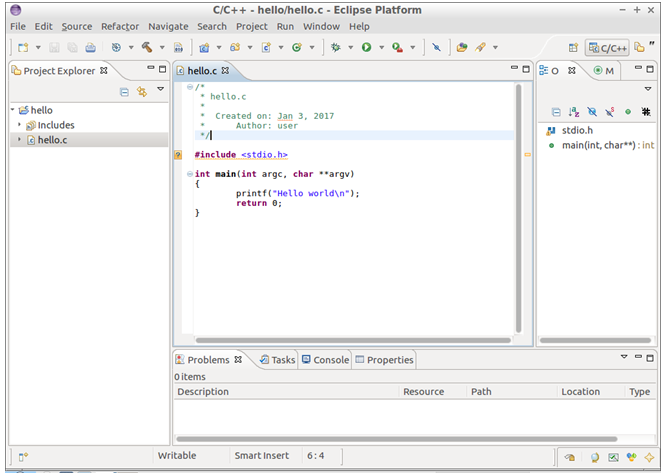
Copy the Hello world application (source code) from the Hello World section to the newly created file as shown in the figure below.
Configure the project
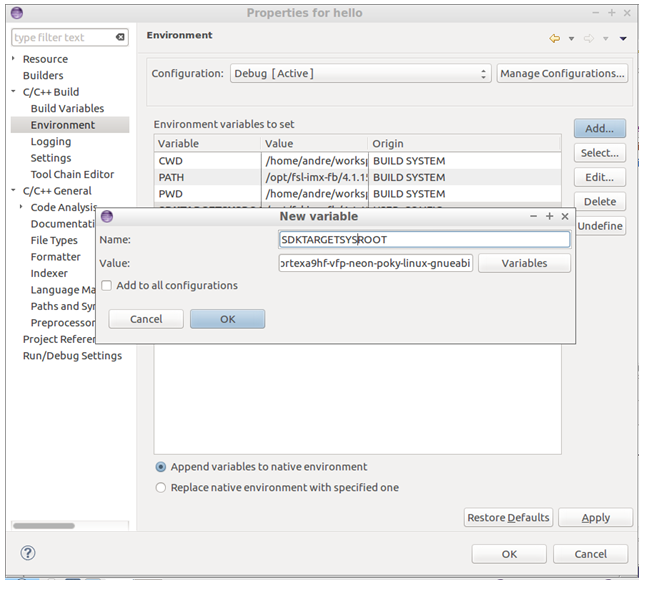
It is now time to configure the project. The path to sysroot is needed in several places so the first step is to create an environment variable specifying this path.
Go to Project → Properties in the menu and then C/C++ Build → Environment. Click the Add button and create a variable named SDKTARGETSYSROOT with the path /opt/fsl-imx-fb/4.1.15-1.2.0/sysroots/cortexa9hf-vfp-neon-poky-linux-gnueabi as shown in the figure below.
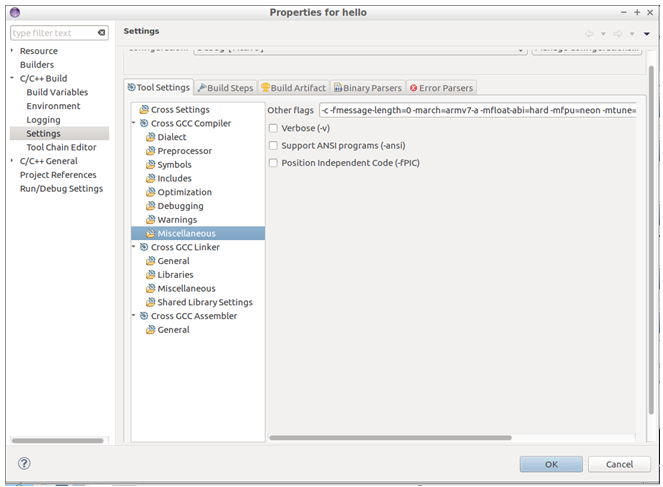
Several compiler options must be specified in order to correctly compile the application. Go to C/C++ Build → Settings and then click on Cross GCC Compiler → Miscellaneous. Add the line below to the Other flags field in this window as shown in the figure below.
-march=armv7-a -mfloat-abi=hard -mfpu=neon -mtune=cortex-a9 --sysroot=${SDKTARGETSYSROOT}
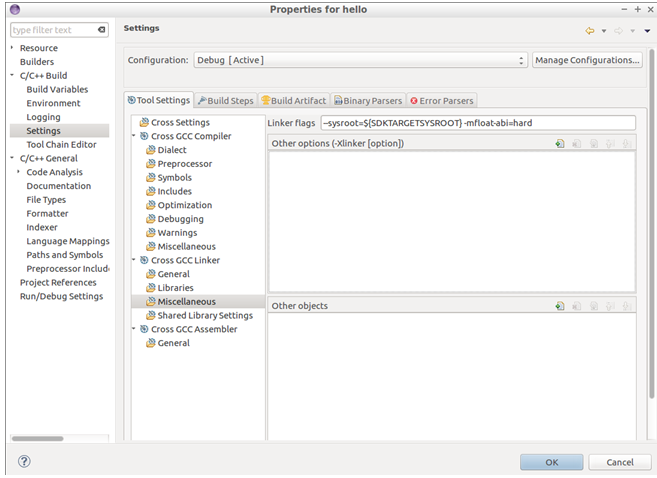
Options must also be given to the linker. Go to C/C++ Build → Settings and then Cross GCC Linker → Miscellaneous. Add the line below to the Linker flags field as shown in the figure below.
--sysroot=${SDKTARGETSYSROOT} -mfloat-abi=hard
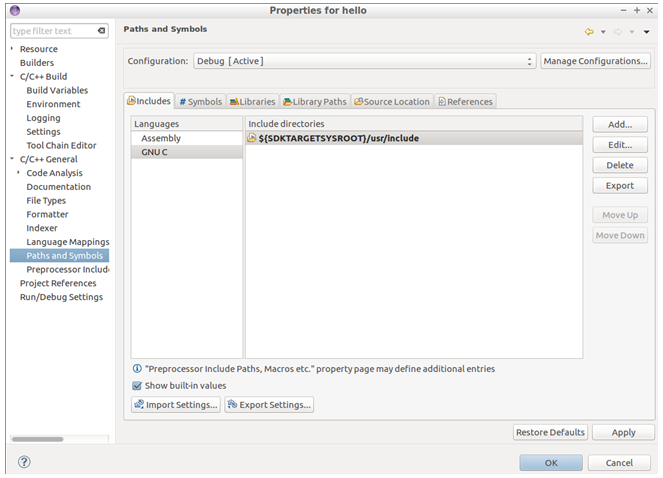
When creating the application you might have noticed that stdio.h was underlined. Holding the mouse cursor above the question mark shows you that stdio.h cannot be found. We need to add a path to the header files to get rid of this warning. Go to C/C++ General → Paths and Symbols and then add the directory ${SDKTARGETSYSROOT}/usr/include. Click the Apply button and then OK.
Build the application
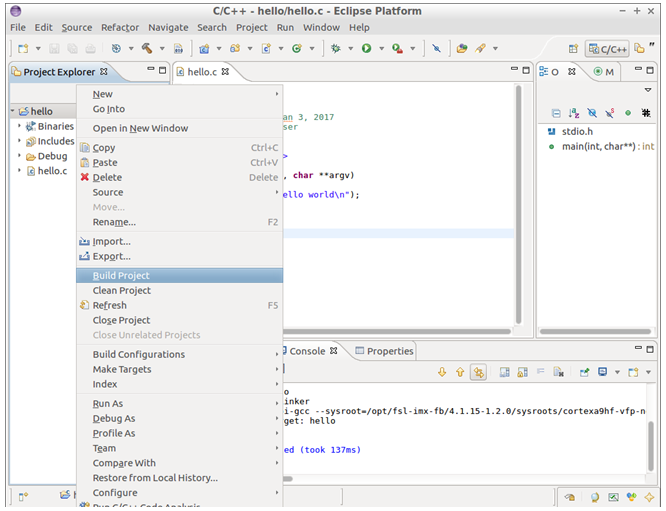
Now it is time to build the application. Right-click on the project (hello) and then select Build Project as shown in the figure below.
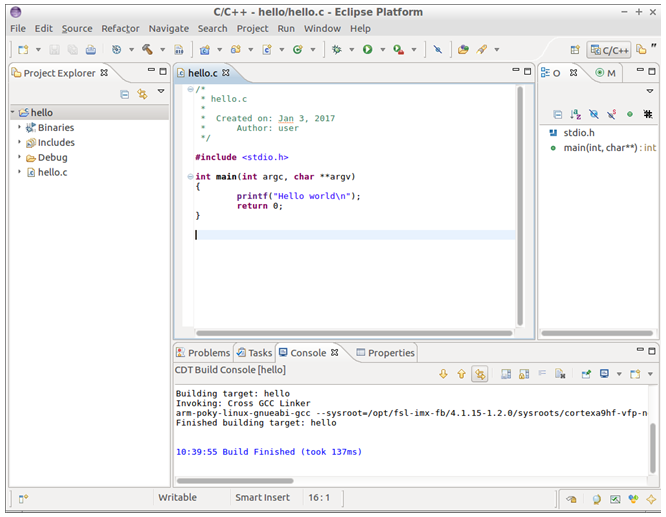
You can see the output of the build in the Console window as shown in the second figure below.
Run the application on target
The application is now located in your workspace under the Debug directory. For these instructions that would be in the directory /home/user/workspace/hello/Debug/. You can use the same instructions as in Run the application on target section to copy the application to a USB memory stick and then to the target.
Another alternative is to use the plugin Remote System Explorer, but first it must be configured.
Open the Remote System Explorer Perspective
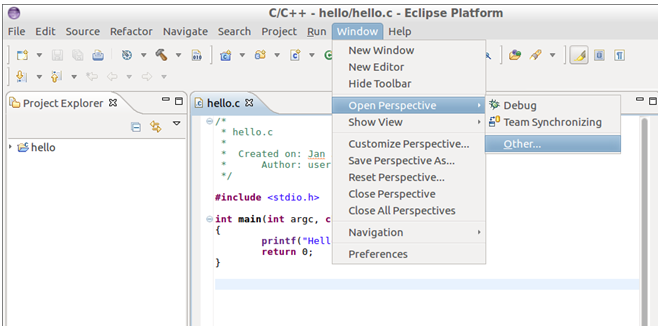
Go to Window → Open Perspective → Other as shown in the figure below.
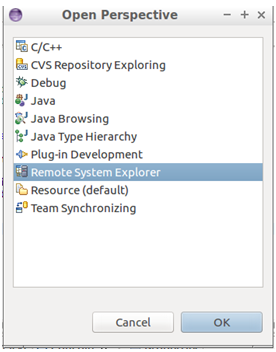
Select Remote System Explorer as shown in the figure below.
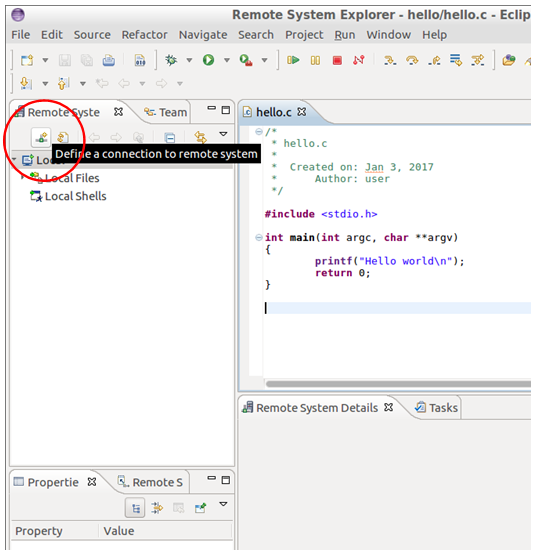
Create connection to remote system
Now it is time to configure the connection to the target. Click on the icon shown in the figure below.
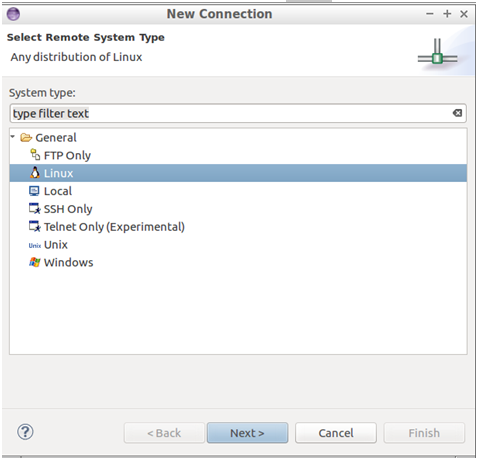
Select Linux as the remote system type as shown in the figure below.
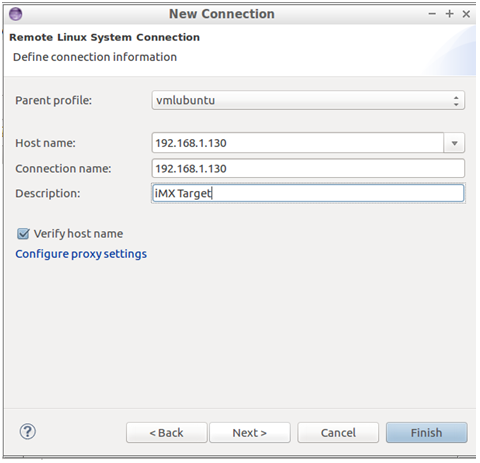
Specify the IP address of the remote target and give it a description as shown in the figure below. Please note that the IP address will most likely be different on your target.
You can get the IP address of the target by using the ifconfig command in a terminal attached to the target.
ifconfig
eth0      Link encap:Ethernet  HWaddr CA:71:64:BD:1A:20
          inet addr:192.168.1.130  Bcast:192.168.1.255  Mask:255.255.255.0
          inet6 addr: fe80:
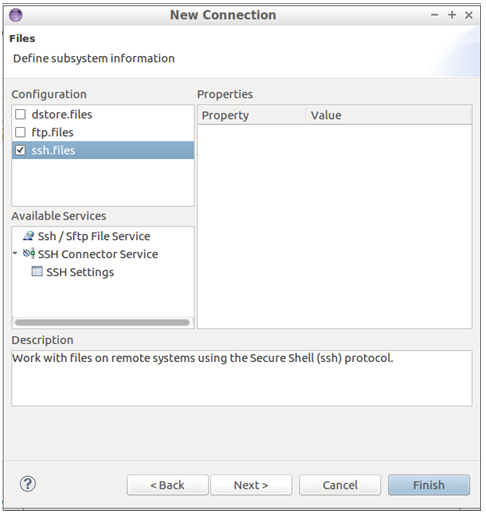
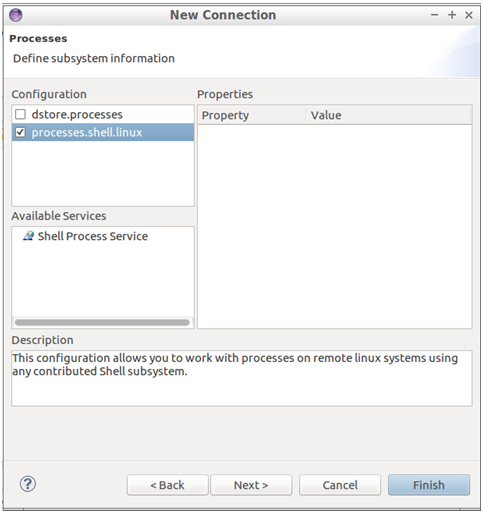
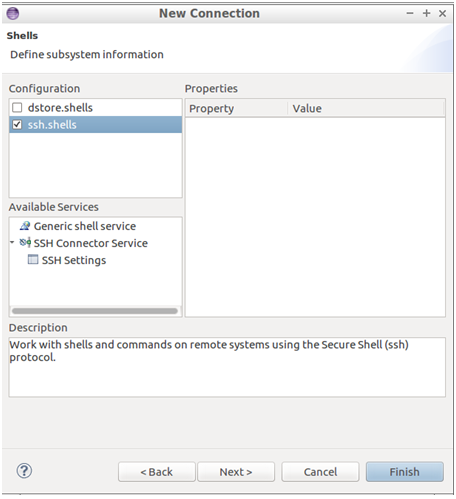
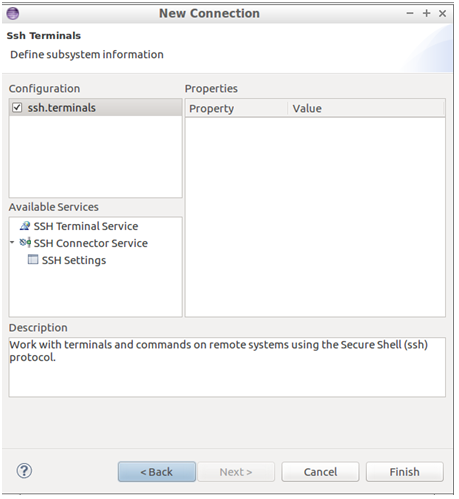
Go through the wizard (click the Next button) and choose ssh-related settings as shown in the next four figures.
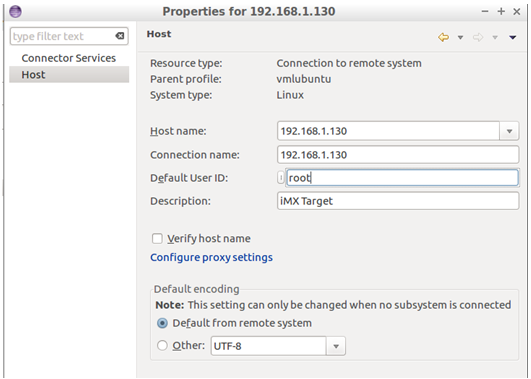
Click Finish. The last step before establishing the connection is to specify which user that should login. Right-click on the connection and select Properties as shown in the figure below.
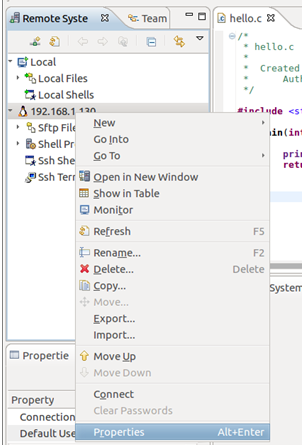
Select Host and then change the Default User ID to root (or another user if you want to login with a different user) as shown in the figure below.
By default, the user root may not permitted to use an SSH connection. See section 5.1 how to permit the user root to login.
Connect to the target by right-click and select Connect as shown in the figure below.
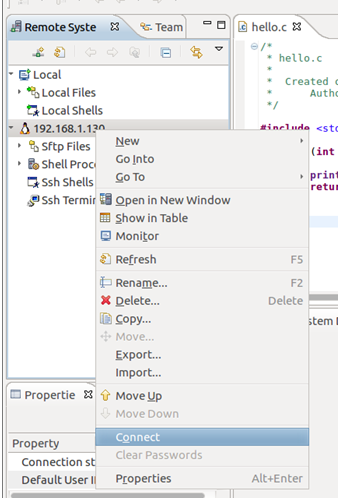
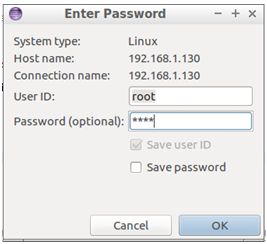
If you are using the user root when logging in the default password is pass.
Copy application to target
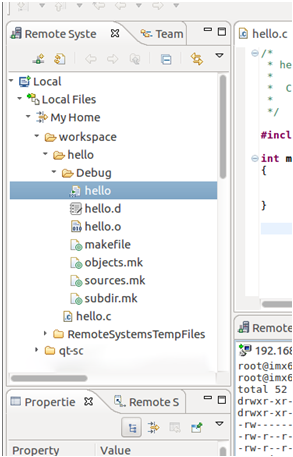
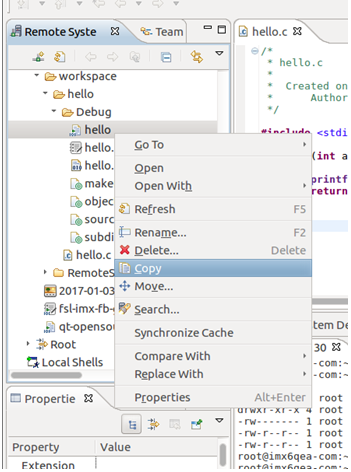
Go to the location of the compiled application. You will find it under Local Files → My Home → workspace → hello → Debug as shown in the figure below.
Right-click on the application file (hello) and select Copy.
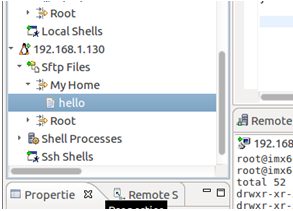
Go to the remote system and paste the application under Sftp Files → My Home as shown in the figure below.

The figure below shows how it looks when the application has been copied to the target.
Start the application
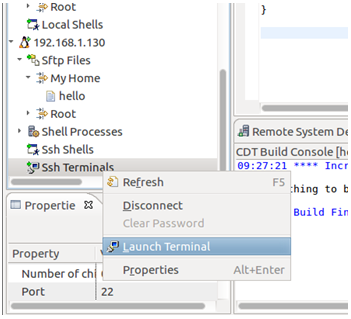
To start the application, we first need to start an SSH terminal. Right-click on Ssh Terminals and select Launch Terminal as shown in the figure below.
The figure below shows the terminal window.
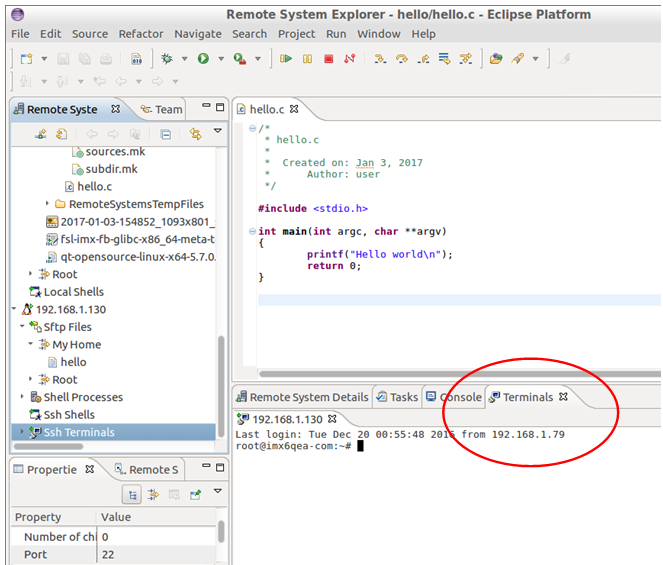
Set execution permissions on the application file.
chmod a+x hello
Run the application
./hello
All the above is shown in the figure below.
Debug the application
For more complicated applications it is really useful to being able to debug the application, that is, single step through the code and inspect variables. This section describes how to debug your application from Eclipse using GDB.
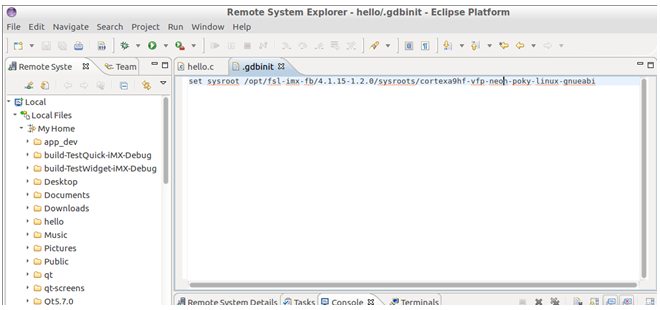
First create the GDB command file (.gdbint) in the project directory. You can do this by right-clicking on the project and then New → File.
We need to set the path to the sysroot in this file in order for GDB to load shared libraries. The path should be the same as set in the SDKTARGETSYSROOT environment variable. Add the line below to the file.
set sysroot /opt/fsl-imx-fb/4.1.15-1.2.0/sysroots/cortexa9hf-vfp-neon-poky-linux-gnueabi
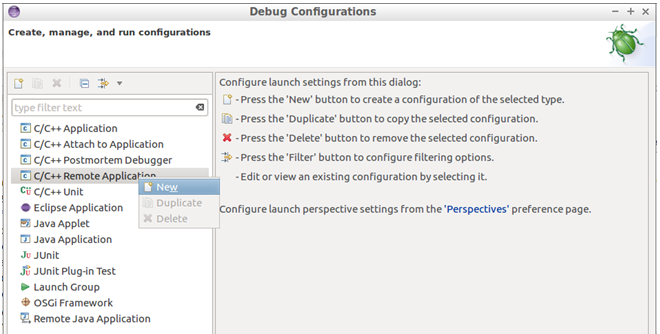
Go to Run → Debug Configurations in the menu and then right-click on C/C++ Remote Application and select New as shown in the figure below.
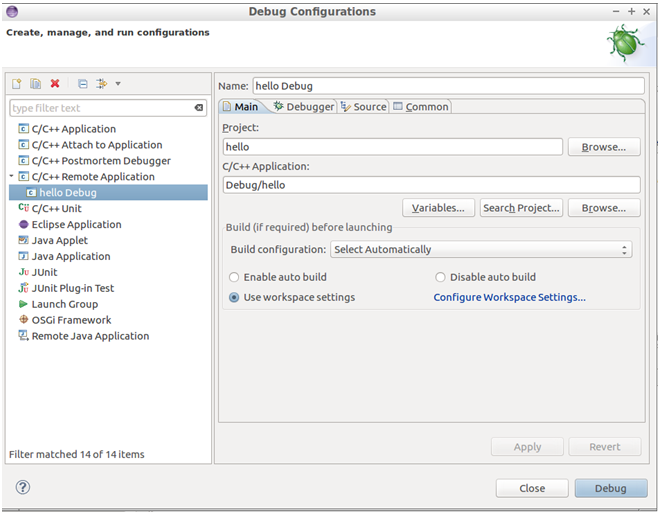
On the Main tab the name of the project is specified as shown in the figure below.
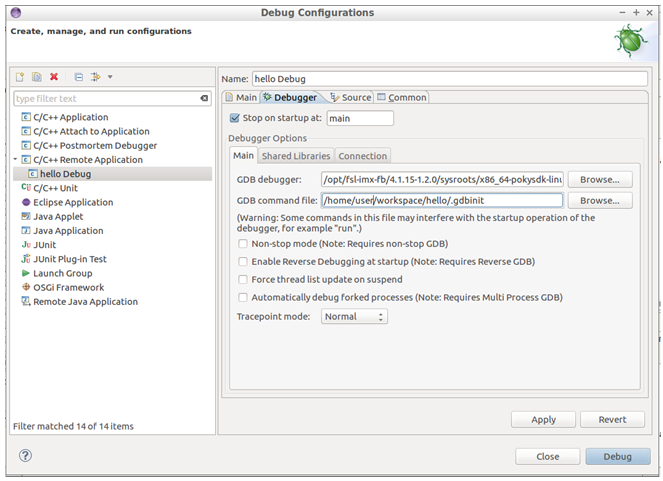
Go to the Debugger tab and set the path to the GDB debugger and GDB command file.
/opt/fsl-imx-fb/4.1.15-1.2.0/sysroots/x86_64-pokysdk-linux/usr/bin/arm-poky-linux-gnueabi/arm-poky-linux-gnueabi-gdb
/home/user/workspace/hello/.gdbinit
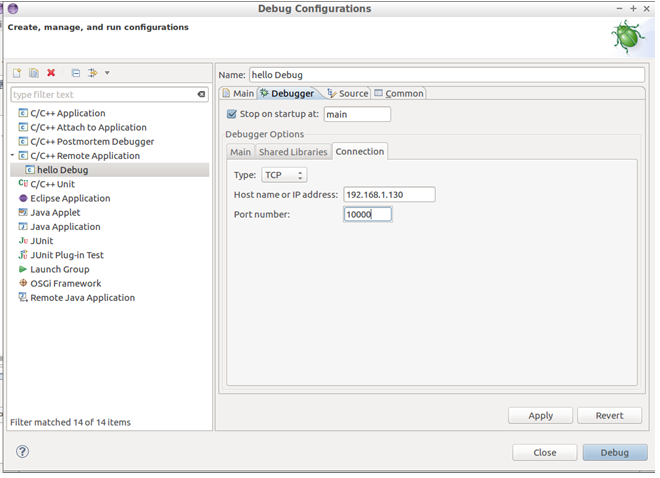
Within the Debugger tab select Connection. Enter the IP address of the target and port number as show in the figure below. The port number is used in the next step and is by default set to 10000.
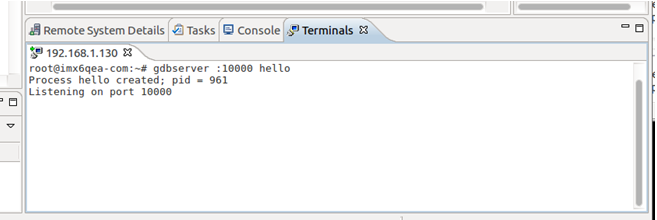
Go back to the SSH terminal and start a GDB server on port 10000 debugging the application hello as shown in the figure below.
gdbserver :10000 hello
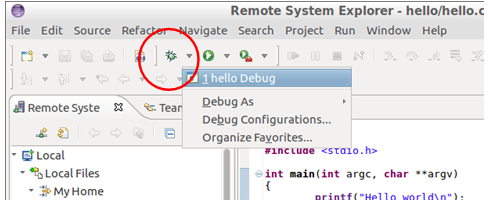
Now it is possible to start to debug the application. Click on the debug icon and then hello Debug as shown in the figure below.
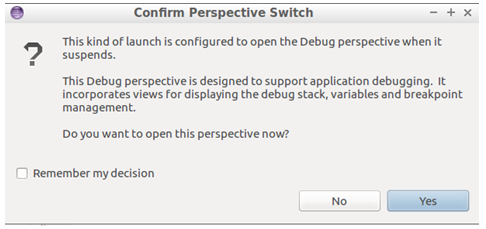
If you are asked to change perspective, click the Yes button as shown the figure below.
A debug session is now started and will break at the main function as shown in the figure below.

Troubleshooting
Allow user root to use an SSH connection
By default, the user root may not permitted to login via an SSH connection. By following these instructions root will be permitted to login through an SSH connection. It is, however, not recommended to use on a final application, but during development it can be permitted.
- Open the configuration file for the SSH server
nano /etc/ssh/sshd_config - Find the line that starts with
#PermitRootLoginand remove the#(hash) character. If you cannot find this line just add it to the file (without the hash)
PermitRootLogin yes
- Save the file and exit the editor (in nano it is Ctrl-X followed by Y and Enter).
- Restart the SSH server
/etc/init.d/sshd restart