Develop with Python
Introduction
Python is a widely used high-level interpreted programming language that has been around since 1991. Python interpreters are available on many operating systems including Linux, Windows and Mac OS.
This guide provides you with step-by-step instructions to start writing Python scripts for the Embedded Artists iMX based COM boards. It is assumed that the reader is familiar with Python as this is no course but rather a getting started guide.
The instructions have been tested on PCs running both Windows and Ubuntu. As Eclipse is a multi-platform IDE the experience is very similar in both operating systems.
Quick Start
All pre-built file system images for the Embedded Artists iMX based COM boards come with a python interpreter already installed.
Hello World
The very first example in most programming languages is a program that writes Hello World on the terminal. In python this can be done with very little code. Start by booting into Linux and then open a new file with an editor:
nano hello.py
Copy and paste the following into the editor:
#!/usr/bin/python
print "Hello World"
Save the file and exit the editor (in nano it is Ctrl-X followed by Y and Enter).
Try the script with:
python hello.py
Hello World
File Example
This example shows how to pass arguments to a script and some very basic file handling. The script does the same as the system command wc, that is it counts the number of lines, words, and bytes in the specified file.
Open an editor:
nano fileinfo.py
Copy and paste the following into the editor:
#!/usr/bin/python

import sys
import os

def printUsage():
    print "Usage:"
    print "    python", sys.argv[0], "<file>"
    exit(0)

def parse(fname):
    lineCount = 0
    wordCount = 0
    byteCount = os.path.getsize(fname)
    with open(fname, 'r') as f:
        lines = f.readlines()
        lineCount = len(lines)
        for line in lines:
            wordCount += len(line.strip().split())
    return (lineCount, wordCount, byteCount)

if __name__ == "__main__":
    if len(sys.argv) != 2:
        printUsage()

    fname = sys.argv[1]
    if not os.path.exists(fname):
        print "File does not exist:", fname
        print
        printUsage()

    (lines,words,bytes) = parse(fname)

    print " " * len(fname), "   Lines   Words   Bytes"
    print "%s   %5d   %5d   %5d" % (fname, lines, words, bytes)
Run the script with the /var/log/messages file as input:
python fileinfo.py /var/log/messages
If there is any problem with the copy-pasting then the script can be downloaded like this instead:
wget http://imx.embeddedartists.com/python/fileinfo.py
DisplayHelper
This is a script that will:
- Extract information about configured displays (actually the frame buffers)
- Draw a pattern on each frame buffer
- Cycle through the backlight settings for each backlight controller to fade the display in and out three times
To download the example (it is too large to include in this document):
wget http://imx.embeddedartists.com/python/DisplayHelper.py
Run the script with:
python DisplayHelper.py
  Found framebuffers: ['/dev/fb0', '/dev/fb1']
  Detected /dev/fb0 - available
  Detected /dev/fb1 - available
  Testing:
    Device:     /dev/fb0
    Size:       800 x 480
    Type:       RGB 888
    Byte/Pixel: 4
    Blank:      /sys/devices/soc0/fb.20/graphics/fb0/blank
  Unblanking
  Drawing 4bpp gradient, h = 120
  Testing:
    Device:     /dev/fb1
    Size:       240 x 320
    Type:       RGB 888
    Byte/Pixel: 4
    Blank:      /sys/devices/soc0/fb.20/graphics/fb1/blank
  Unblanking
  Drawing 4bpp gradient, h = 80
  Found backlights:
    path: /sys/class/backlight/backlight2.22
    actual_brightness: 7
             bl_power: 0
           brightness: 7
       max_brightness: 7
                 type: raw
               uevent: bin(0)
  Waiting 5 seconds before backlight tests...
  Starting backlight manipulation..
  Adjusting brightness for backlight2.22
    loop= 0 lvl= 0
    loop= 0 lvl= 1
    loop= 0 lvl= 2
    ...
Target Requirements
All pre-built file system images for the Embedded Artists iMX based COM boards come with a Python interpreter already installed. Additional packages can be added either using Yocto when setting up the file system or in runtime using the pip package manager.
Adding Packages Using Yocto
At the time this document was written the following packages could be added using Yocto:
python-async           python-imaging        python-pyparted
python-autobahn        python-jinja2         python-pyqt
python-backports-ssl   python-ldap           python-pyrex
python-certifi         python-lxml           python-pyserial
python-cffi            python-m2crypto       python-pytz
python-cheetah         python-mako           python-pyudev
python-cloudeebus      python-markupsafe     python-pyusb
python-cmd2            python-matplotlib     python-pyyaml
python-cython          python-mccabe         python-pyzmq
python-dateutil        python-mock           python-requests
python-dbus            python-msgpack        python-scons
python-dbusmock        python-nose           python-simplejson
python-decorator       python-numeric        python-six
python-distribute      python-numpy          python-slip-dbus
python-django          python-pep8           python-smartpm
python-django-south    python-pexpect        python-smbus
python-docutils        python-pip            python-smmap
python-enum34          python-prettytable    python-snakefood
python-epydoc          python-psutil         python-sqlalchemy
python-feedparser      python-pyalsaaudio    python-tornado
python-flufl-enum      python-pycairo        python-twisted
python-futures         python-pycparser      python-ujson
python-gdata           python-pycurl         python-urllib3
python-gevent          python-pyflakes       python-vobject
python-git             python-pygobject      python-webdav
python-gitdb           python-pygtk          python-zopeinterface
python-greenlet        python-pyopenssl
python-gst             python-pyparsing
The instructions on how to find available packages as well as how to include them in the image build is explained in the Yocto guide.
Adding Packages Using PIP
Pip is a package management system used to install software packages written in Python. Pip can be used to install Python extensions from an online repository containing more than 80000 packages. With the correct extension installed almost anything can be done in Python.
Pip can be installed by including the python-pip package when building the file system as explained in the previous section. It has already been installed in the prebuilt images from Embedded Artists.
Pip handles packages from https://pypi.python.org/pypi which claims to have more than 80000 packages. To install the prettytable package:
pip install prettytable
Downloading/unpacking prettytable
  Downloading prettytable-0.7.2.zip
  Running setup.py (path:/var/volatile/tmp/pip_build_root/prettytable/setup.py) egg_info for package prettytable

Installing collected packages: prettytable
  Running setup.py install for prettytable

Successfully installed prettytable
Cleaning up...
note
Note that a lot of pip packages have dependencies and if not met the package cannot be installed. A careful inspection of the output from pip will give a clue to what is missing.
Remote Debugging Using Eclipse
This section describes how to setup the Eclipse IDE with python support and the extra bits needed to remotely debug code running on the Embedded Artists iMX based COM boards.
Prepare Target
SSH Server
The PC software requires an SSH connection to the target in order to control it and transfer files to/from it. The SSH server can be installed on the target by including the ssh-server-openssh feature when building the image. It has already been installed in the prebuilt images from Embedded Artists.
The images built with Yocto have two users: tester with no password and root with the password pass. To gain access to all files and folders, use the root user when developing.
Use an SSH client on the PC and try to connect to the target. Make sure that it works before continuing on with the steps below to avoid problems down the road. If you have problems creating an SSH connection to the target see the Cannot get an SSH connection... section for more instructions.
PyDev Debugger (pydevd)
PyDev Debugger is the backend (running on the target) to the PyDev Eclipse plugin that will be used on the PC. To install the package:
pip install pydevd
Downloading/unpacking pydevd
  Downloading pydevd-0.0.6.zip (1.1MB): 1.1MB downloaded
  Running setup.py
...
  Plain-python version of pydevd installed (cython speedups not available).
Successfully installed pydevd
Cleaning up...
The output of the pip command above has been edited as it included some warnings. The installed pydevd will work despite the warnings.
Prepare PC
The PC needs to have Python installed as well as the Eclipse IDE with the PyDev and Remote System Explorer plugins. This will be covered below.
Python
The first thing is to install Python. It is best to choose the same version as the one used on the target. To check which version that is used run the following command in a terminal:
python -V
Python 2.7.9
A Python installer can be downloaded from https://www.python.org/downloads/.
Eclipse
The next thing to do is to download and run the Eclipse installer from (https://www.eclipse.org/downloads/). When this guide was written the latest version was called Neon. Select the Eclipse IDE for C/C++ Developers version when prompted:
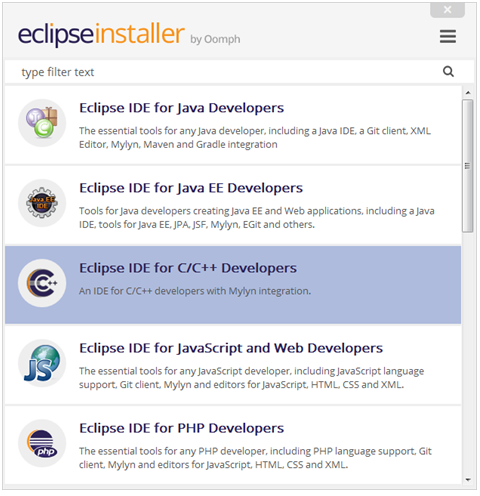
Complete the wizard, accept the license agreement, and wait for the installation to complete.
Install PyDev plugin in Eclipse.
Start Eclipse
Go to Help → Eclipse Marketplace
Search for PyDev and then click Install
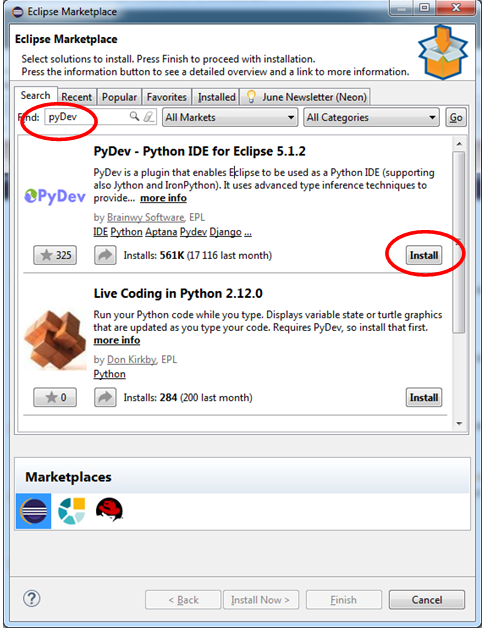
Accept license agreements to continue with the installation
When presented with the "Selection Needed" dialog it is important to mark the Brainwy Software as trusted before clicking OK, otherwise the installation may fail.
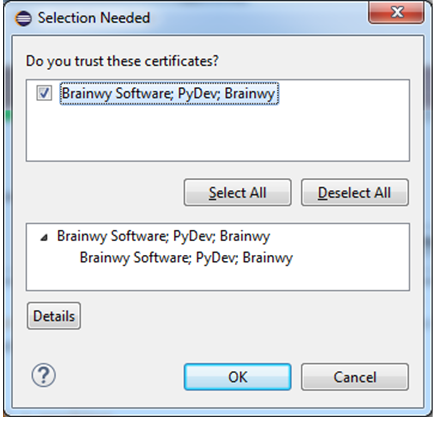
Agree to restart Eclipse for the changes to take effect
Go to Window → Preferences
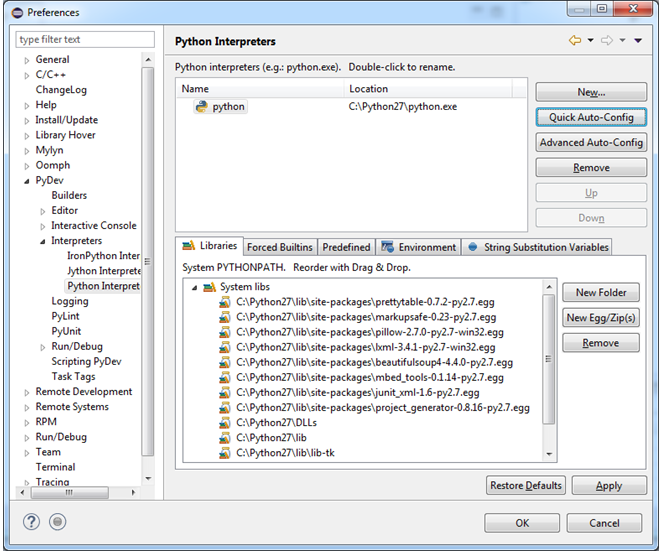
Navigate to PyDev → Interpreters → Python Interpreters and click Quick Auto-Config
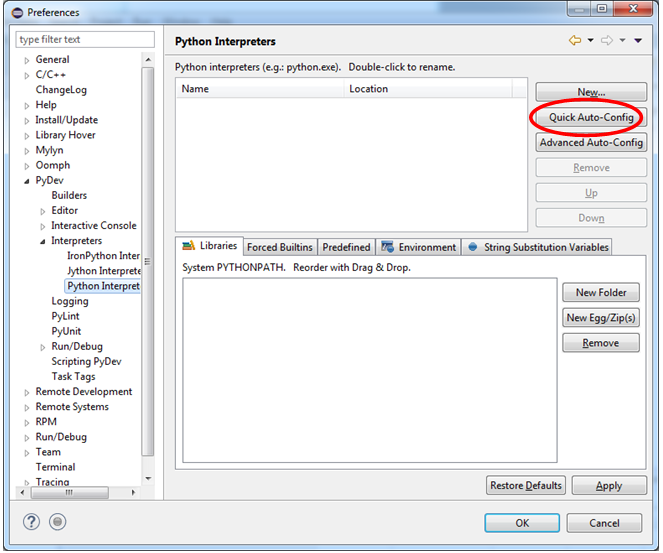
Everything should now be filled in so click OK to save the settings
Install Remote System Explorer Plugins
Go to Help → Install New Software
Change to work with -- All Available Sites -- and wait for the list to load
Enter remote as filter
Select Remote System Explorer User Actions
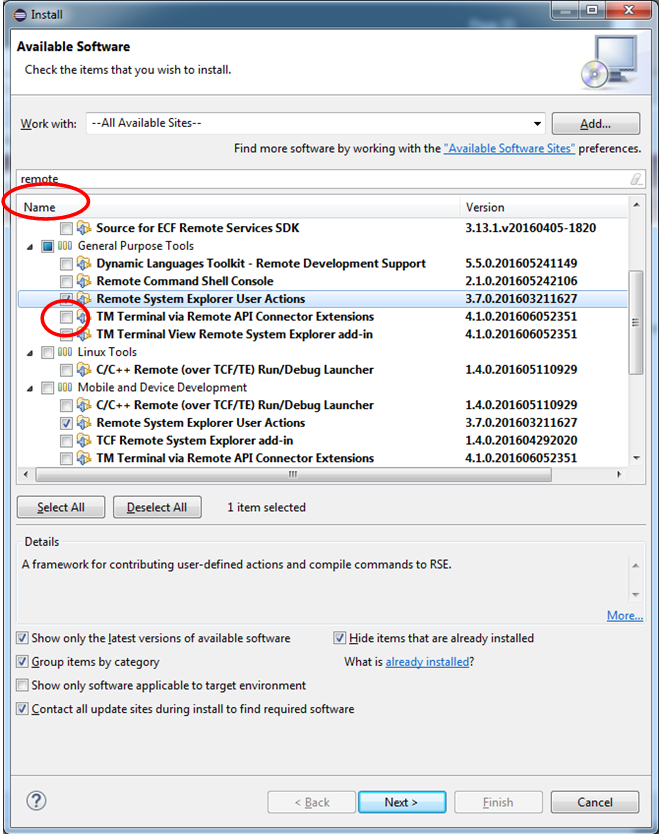
Click Next, accept licences and finally restart Eclipse
The PC is now ready.
Setup a Connection to Target
It is time to configure Eclipse so that it knows how to connect to the target. This is needed for debugging as well as adding/updating/deleting files.
Go to Window → Perspective → Open Perspective → Other...
Select Remote System Explorer from the list. If it does not appear in the list then go back to the section above and make sure the installation instructions have been followed completely.
Right-click in the Remote Systems View and select to create a new connection
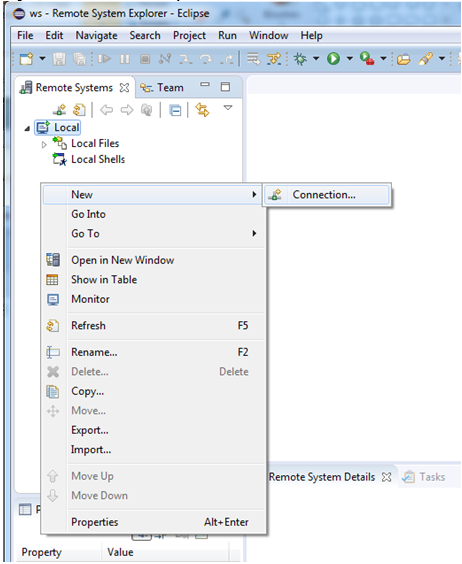
Select SSH Only as System Type and click Next
Fill in the IP number of the target and click Finish
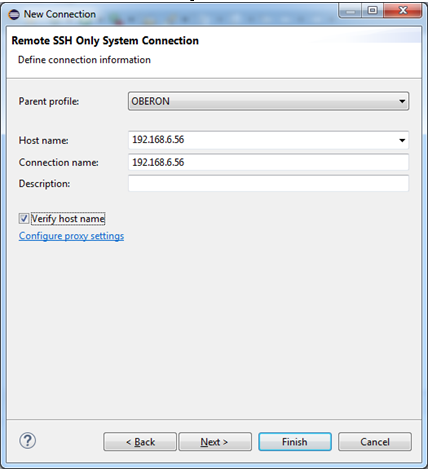
There will now be a new item in the Remote System View. Expand the Sftp Files node to see parts of the file system on the target.
An Enter Password dialog will appear when attempting to expand the Root node. If the password was changed or a user was added then fill in that information, otherwise use the default which is root as user and with pass as password.
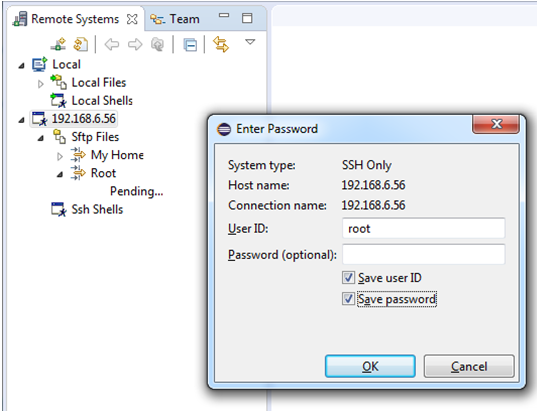
A warning about an RSA key fingerprint may appear. Click Yes to continue.
It should now be possible to browse the target's file system without any more dialogs appearing.
Create a Project
Now that everything has been prepared it is finally time to create the python project. This is done in the Remote System View.
Expand the target node down to the My Home node
Right-click and add the project folder, in this example called
myproj1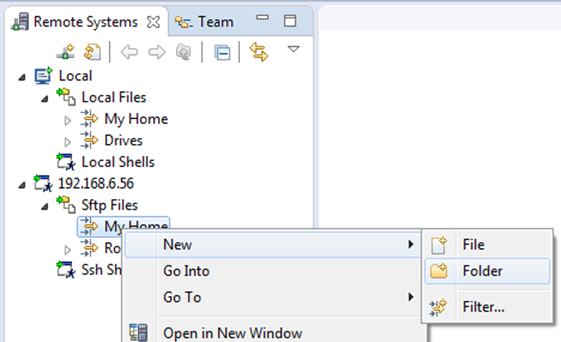
Now turn that folder into a project by right-clicking on it and selecting the Create Remote Project option. It will seem like nothing happens.
Add a new file to the
myproj1folder, in this example calledtest.pyDouble-click the
test.pyfile and then copy-paste the following into it:#!/usr/bin/python
import sys
import pydevd
pydevd.settrace('192.168.6.54') # replace IP with address
# of Eclipse host machine
i = 3
p = 'Hello!' * i
print p
Debug
Open the Debug perspective in Eclipse by going to the Window → Perspective → Open Perspective → Other...
Select Debug from the list and click OK
Click the Start the pydev server button

Don't confuse the button with the normal debug button. The server button has a small p on it.
Now start the program on the target. Type the following in the terminal:
cd myproj1/
python test.py
The debugger should now start in Eclipse
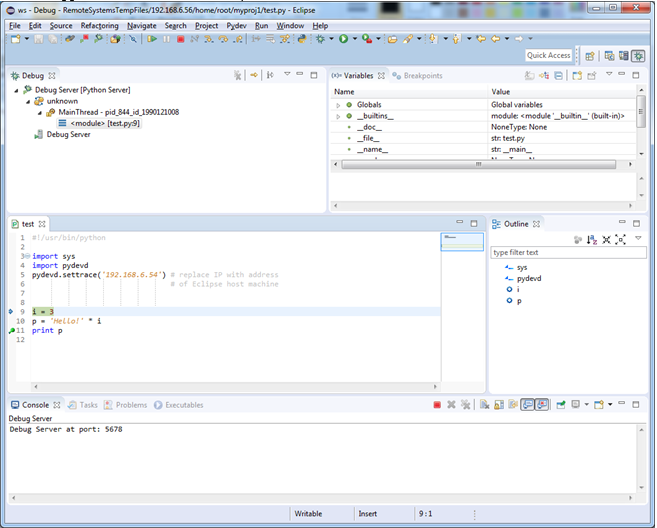
The debugger has options to set breakpoints, inspect/change variable values, single step and run through code. The debug server will keep running even if the test script reaches its end. Just run again from step 4 as many times as is needed.
Breakpoints
Due to the way that PyDev handles paths, breakpoints may not work. To fix this (only needed one time per target):
Double-click on the area to the left of the line number in
test.pyto set a breakpointStart the program
cd myproj1/
python test.py

warning: Debugger speedups using cython not found. Run '"/usr/bin/python" "/usr/lib/python2.7/site-packages/setup_cython.py" build_ext --inplace' to build.

pydev debugger: warning: trying to add breakpoint to file that does not exist: /home/root/myproj1/C:/temp/2016-07-05/ws/RemoteSystemsTempFiles/192.168.6.56/home/root/myproj1/test.py (will have no effect)
To fix this use the Remote Systems View in Eclipse and browse to Sftp Files → Root → usr → lib → python2.7 → site-packages
Double-click on
pydev_file_utils.pyto open itScroll down to the line with
PATHS_FROM_ECLIPSE_TO_PYTHON = []Change that line to
PATHS_FROM_ECLIPSE_TO_PYTHON = [
(r'C:\temp\2016-07-05\ws\RemoteSystemsTempFiles\192.168.6.56\home\root',
r'/home/root')
]
Substitute the path with what your warning pointed to (marked in green in step 2 above) as it depends on where your workspace is located.
Save the file
Stop and restart the debugging
note
When tested on a PC running Ubuntu 14.04 the breakpoints worked without the fix above and the statement should be kept at the default which is
PATHS_FROM_ECLIPSE_TO_PYTHON = [ ]
Exiting Eclipse
The best way to exit eclipse after having used the debugger is:
- Stop any running debug session
- Stop the debug server
- Save changes in open files
- Disconnect from the Remote System
- Exit eclipse
- Shut down the target (if no longer needed)
Remote Shell
It is always possible to enter commands on the target using either a terminal program or an SSH program. The Remote System Explorer plugin adds another way - the Remote Shell. To enable it go to the Window → Show View menu and then select the Remote Systems → Remote Shell option in the dialog. Use the menu button in the Remote Shell* tab and select the target:
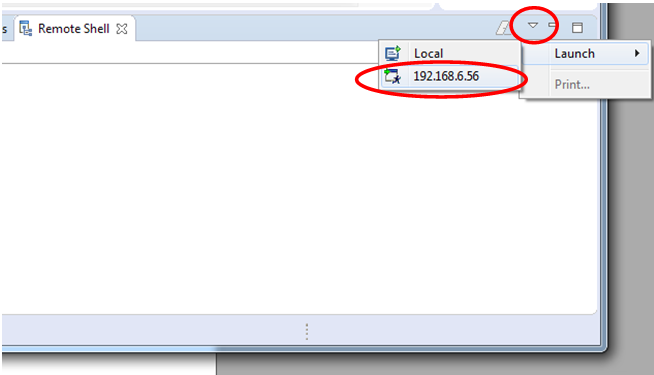
Target Changed IP Address
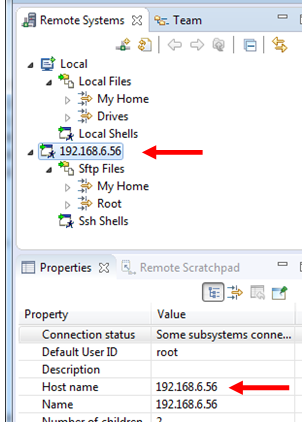
The project that was created in the Create a Project section above was set to use a fixed IP address (192.168.6.56) and if that IP address changes after a reboot of the target then Eclipse cannot connect. This can be fixed either by changing the target from a dynamic to a fixed IP address (not covered by this guide) or by changing the IP number in Eclipse. The IP number is found by selecting the target node in the Remote Systems View.
Click on the current IP number (192.168.6.56) in the field next to Host Name and change it to the new one. Don't change the Name as that will cause problems with the local copy of the remote project.
Further Expansion
The links in this section are to give some starting points when searching for ways to extend your Python scripts or to learn more about Python. We have not tested or verified any of the frameworks, packages or plugins and cannot guarantee that they will work.
- Beginner: Introductory Books
- Beginner: Examples and Sample Code
- Beginner: Links to more books, tutorials, and lessons
Other IDEs?
There are a lot of alternative to using Eclipse, just look at the list on the python wiki: https://wiki.python.org/moin/IntegratedDevelopmentEnvironments.
Available GUI package(s)?
There are a lot of options when it comes to GUI development using python:
https://wiki.python.org/moin/GuiProgramming
Some of the more frequently mentioned ones are (in no particular order):
- Kivy - http://kivy.org/
- PyQT - https://wiki.python.org/moin/PyQt
- PyGUI - http://www.cosc.canterbury.ac.nz/greg.ewing/python_gui/
- libavg - https://www.libavg.de/site/
- wxPython - http://wxpython.org/
Other modules/libs that are good to have?
https://wiki.python.org/moin/UsefulModules
Troubleshooting
Cannot get an SSH connection to the target
If you have problems getting an SSH connection to the target follow the steps below. PuTTY will be used as SSH client in these steps. The client can be downloaded from www.putty.org.
Get the IP address of the target. Enter the command in a terminal application connected to the target (as described in the Getting Started manual). In the example below the IP address is 192.168.6.50.
ifconfigeth0 Link encap:Ethernet HWaddr 00:1A:F1:10:00:9A
inet addr:192.168.6.50 Bcast:192.168.6.255 Mask:255.255.255.0
inet6 addr: fe80::21a:f1ff:fe10:9a/64 Scope:Link
UP BROADCAST RUNNING MULTICAST MTU:1500 Metric:1Start PuTTY and enter the IP address into the Host Name field and then click the Open button.
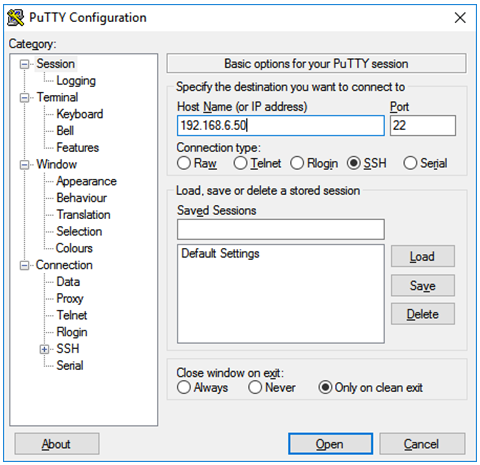
You will be asked to enter a username. Enter
root.You will then be asked to enter a password. Enter
pass.Now you are logged into the target via an SSH connection. If you get an
Access deniedmessage please follow the instructions below.
Solve Access denied problem
By default, SSH may not allow the user root to login. The instructions below assume that you have a terminal application connected to the target.
- Open the configuration file for the SSH server
nano /etc/ssh/sshd_config - Find the line that starts with #PermitRootLogin and remove the ‘#’ (hash) character. If you cannot find this line just add it to the file (without the hash)
PermitRootLogin yes - Save the file and exit the editor (in nano it is Ctrl-X followed by Y and Enter).
- Restart the SSH server
/etc/init.d/sshd restart - Now try to connect to the target again.