Develop with Qt5
Introduction
Qt is a feature rich and cross-platform application framework developed by the Qt Company. Many associate Qt with GUI development, but it is possible to do much more than just the GUI using the Qt framework.
This document provides an overview of Qt and step-by-step instructions for setting up Qt Creator - the development environment for Qt. This is not a complete course in application development using the Qt framework. For this purpose, please visit doc.qt.io.
Overview of Qt
Qt is an application framework written in C++ and supported by many platforms such as Linux, Windows, and OS X. The application framework is mainly developed by the Qt Company, but other companies and individuals are also involved.
Licenses
Qt is available under both commercial licenses and open-source licenses. The open-source licenses are either GPL or LGPL3 depending on which part of Qt you are looking at. Most of the core libraries are under GPL while most of the APIs are LGPL3.
Please note that some modules and functionality is only available when using the commercial license.
More information about Qt licensing can be found at www.qt.io/faq/
User interfaces
Qt offers several ways of developing a user interface; Qt Widgets, Qt Quick, and Qt WebEngine. A short description of these technologies is available below, but for a more in-depth description and comparison please visit: doc.qt.io/qt-5/topics-ui.html.
Qt Widgets
The user interface is developed using the C++ programming language often in combination with the graphical tool Qt Designer. Qt Widgets is often used to create classic desktop-style user interfaces with a native look and feel. A native look and feel means that the GUI looks as it normally does on the platform, for example, as normal Windows applications when developing on a Windows platform.
Qt Widgets has not been designed to benefit from a Graphical Processing Unit (GPU) since it is using a raster paint engine (QPainter) when drawing its graphical elements.
Qt Quick
Qt Quick is described as a module you can use to develop fluid and dynamic user interfaces with animations and effects - the type of GUI you usually see in mobile devices.
With Qt Quick the user interface is developed using QML – a declarative language with a JSON-like syntax. The whole application can be written in QML, but normally only the GUI is written in QML and the other parts of the application is written in C++. As with Qt Widgets there is tool support in the form of Qt Quick Designer that helps you develop the GUI.
Qt Quick has been designed to be hardware accelerated and has because of this a dependency towards OpenGL.
Not all of Embedded Artists COM boards support QtQuick when using the open-source version of Qt. See the Supported modules - Qt Quick section for more information.
Qt WebEngine
Qt includes a web engine that lets you include web content into the application. This means that the entire user interface or parts of it can be developed using web technologies such as HTML, CSS, and JavaScript. For more information about developing with web content visit the link below.
https://doc.qt.io/qt-5/topics-web-content.html
Qt Essentials
The foundation of Qt is called Qt Essentials and includes the user interface functionality described above, but also a lot more. The table below contains a short description of some of the modules in Qt essentials. For a more complete list and description visit the link below.
https://doc.qt.io/qt-5/qtmodules.html
| Module | Description |
|---|---|
| Qt Core | Non-graphical classes used by other modules. This module, for example, contains the object communication functionality called signals and slots. It also defines the object model and property system. |
| Qt Multimedia | Audio, video, radio, and camera functionality. The exact support depends on the underlying platform. |
| Qt Network | This module contains classes that provide networking (TCP/IP) functionality. |
| Qt SQL | Database functionality is offered through this module. |
| Qt Test | This module provides classes for unit testing. |
In addition to all the modules in Qt essentials there are also many add-on modules. Please visit the link above the table for more details.
Qt on iMX Developer’s Kits
Yocto image
The Yocto image that adds Qt5 support to the target is fsl-image-qt5.
Before building this image we need to add support for an SFTP server. The SFTP server allows us to download a Qt application to the target from within Qt Creator.
Open the file <build dir>/conf/local.conf
nano conf/local.conf
Locate the IMAGE_INSTALL_append variable and add the following two lines:
   openssh-sftp \
   openssh-sftp-server \
Now you can build the Qt5 image and an SFTP server will be included.
bitbake fsl-image-qt5
Qt version
Embedded Artists provides two several Yocto branches (BSP versions). It is Qt version 5.5.0 that is used in the 3.14.52 branch and version 5.5.1 that is used in the 4.1.15 branch.
There is a Qt layer called meta-qt5 in Yocto and the version that is used can be found in meta-qt5/recipes-qt/qt5/qt5-git.inc.
Supported modules
The table below lists Qt modules and if they are built for a COM board, or not. Even though a module is available, all functionality hasn’t been tested by Embedded Artists. The table has been compiled by listing the Qt libraries available in the root file system by running the command below.
cd /usr/lib
ll | grep Qt
The second column (iMX6Q/D6DL/SX) in the table reflects the Qt support for iMX6 Quad, iMX6 Dual, iMX6 DualLite and iMX6 SoloX. The third column (iMX7D/iMX6UL) reflects the Qt support for iMX7 Dual COM, iMX7 Dual uCOM, and iMX6 UltraLite.
| Module | iMX6Q/D/DL/SX | iMX7D/iMX6UL |
|---|---|---|
| Qt 3D | X | |
| Qt Bluetooth | X | |
| Qt Concurrent | X | X |
| Qt Core | X | X |
| Qt D-Bus | X | X |
| Qt GUI | X | X |
| Qt Location | X | |
| Qt Multimedia | X | |
| Qt Multimedia Widgets | X | |
| Qt Network | X | X |
| Qt NFC | X | |
| Qt OpenGL | X | |
| Qt Platform | X | |
| Qt Positioning | X | |
| Qt Print Support | X | X |
| Qt QML | X | |
| Qt Quick | X | |
| Qt Quick Widgets | X | |
| Qt Script | X | |
| Qt Sensors | X | |
| Qt Serial Port | X | |
| Qt SQL | X | X |
| Qt SVG | X | |
| Qt Test | X | X |
| Qt WebChannel | X | |
| Qt WebSockets | X | |
| Qt Widgets | X | X |
| Qt XML | X | X |
| Qt XML Patterns | X |
Qt Quick
As mentioned in the User interfaces - Qt Quick section, Qt Quick is a module that lets you create nice looking user interfaces. Because of this many want to use Qt Quick. This module however depends on OpenGL and a graphical processing unit (GPU) and is therefore not supported on all Embedded Artists COM boards. It is not supported on iMX6 UltraLite COM, iMX7 Dual COM, and iMX7 Dual uCOM because the processors on these boards don’t have a GPU.
Even though a board lacks a GPU it could be possible to use Qt Quick with a software rendered graphical engine. The performance would however be worse than on board that has a GPU. NXP has therefore decided not to include Qt Quick in the Qt recipes in Yocto.
If you would like to use Qt Quick on boards without a GPU you should have a look at Qt’s module Qt Quick 2D Renderer. This is an alternative renderer for Qt Quick that uses the raster paint engine instead of OpenGL. Please note that this module is only available in the commercial versions of Qt. For more information visit the link below.
https://doc.qt.io/QtQuick2DRenderer/
Setup QtCreator
The instructions in this section have been tested on a virtual machine running lubuntu 16.04.
If you are an experienced Linux user it shouldn’t be a problem getting Qt Creator to run on another Linux distribution with the instructions below as a guideline.
Install toolchain
To be able to build Qt applications that will run on Embedded Artists iMX based COM boards a toolchain is needed. The toolchain contains cross compiler, linker, Qt headers and needed libraries.
The toolchain can be built in Yocto using the meta-toolchain-qt5 image.
bitbake meta-toolchain-qt5
The build will result in a file located at <build directory>/tmp/deploy/sdk. The exact name of the file depends on several parameters, but in our example it is called:
fsl-imx-fb-glibc-x86_64-meta-toolchain-qt5-cortexa9hf-vfp-neon-toolchain-4.1.15-1.2.0.sh
| Part of file name | Description |
|---|---|
fsl-imx-fb | The distribution (DISTRO parameter) used when initializing the build. |
x86_64 | Architecture of the host computer. In this example a 64-bit Intel x86 platform. |
4.1.15-1.2.0 | BSP version |
It is recommended to build this toolchain on your host computer where you will do the Qt development, but if you have a 64-bit Intel x86 based host computer you can download a pre-built version from imx.embeddedartsits.com.
wget sw.embeddedartists.com/common/fsl-imx-fb-glibc-x86_64-meta-toolchain-qt5-cortexa9hf-vfp-neon-toolchain-4.1.15-1.2.0.sh
Install the toolchain. It is recommended to use the default settings (such as installation path) when installing.
sudo ./fsl-imx-fb-glibc-x86_64-meta-toolchain-qt5-cortexa9hf-vfp-neon-toolchain-4.1.15-1.2.0.sh
Install Qt Creator
Offline installers of Qt Creator are available at: https://download.qt.io/official_releases/qt/. The instructions below are based on instructions from https://wiki.qt.io/Install_Qt_5_on_Ubuntu.
Download installer
wget download.qt.io/official_releases/qt/5.7/5.7.0/qt-opensource-linux-x64-5.7.0.run
Adjust permission
chmod +x qt-opensource-linux-x64-5.7.0.run
Run installer
./qt-opensource-linux-x64-5.7.0.run
In general, the default settings have been used when installing Qt Creator. Please note that a Qt account is required when installing Qt Creator as shown in the figure below. Choose an existing account or create a new account. There is no cost associated with a Qt account.

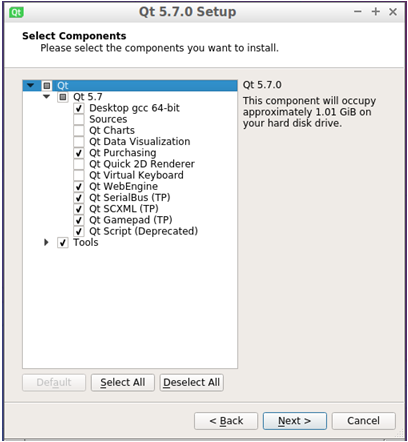
The default components to install were selected as shown in the figure below. If you plan to choose other components select these at this step. Please note that some components may only be available when using a commercial version of Qt.
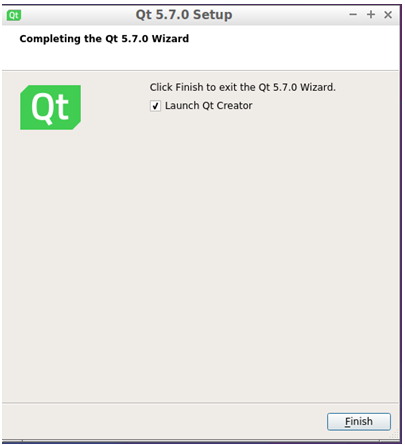
When Qt Creator has been installed select to launch it and click the Finish button and then continue to the next section of this guide.
Configure Qt Creator
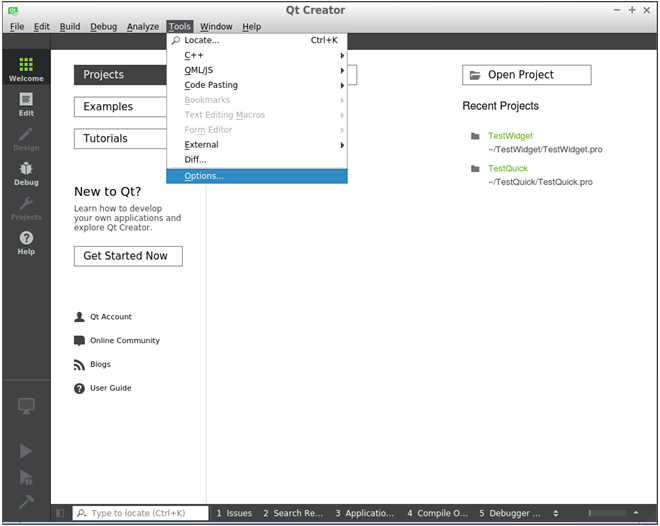
Qt Qreator needs to be configured to use the toolchain that was previously installed. Begin by opening the Options dialog: Tools → Options.
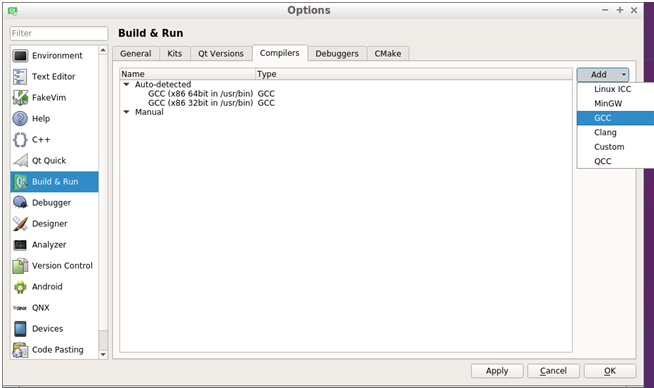
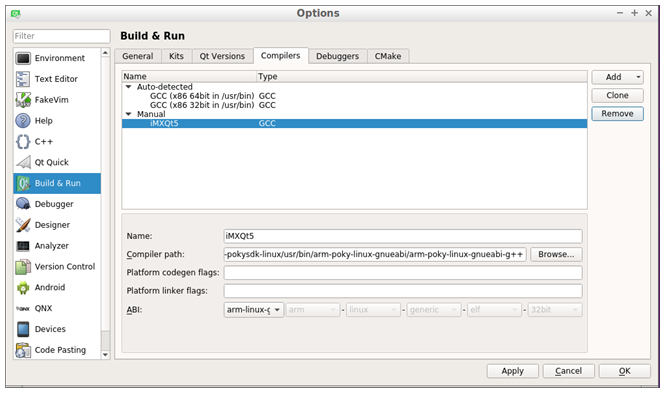
Select Build & Run in the left menu and then the Compilers tab. Click the Add button and then GCC as shown in the figure below.
Choose a name for the compiler and then select the path to the compiler. In this example the compiler is located at:
/opt/fsl-imx-fb/4.1.15-1.2.0/sysroots/x86_64-pokysdk-linux/usr/bin/arm-poky-linux-gnueabi/arm-poky-linux-gnueabi-g++
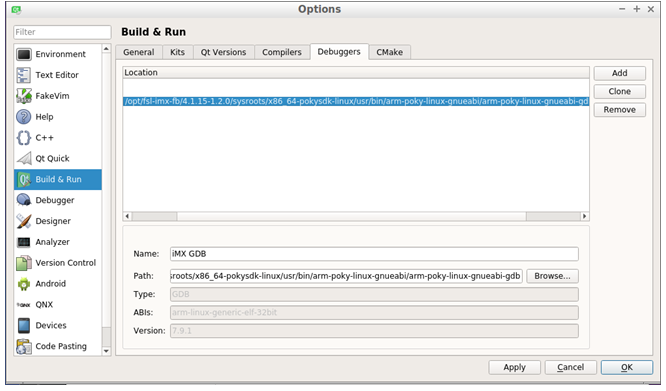
Go to the Debuggers tab as shown in the figure below and click the Add button. Select the path to the GDB debugger. In this example it is located at:
/opt/fsl-imx-fb/4.1.15-1.2.0/sysroots/x86_64-pokysdk-linux/usr/bin/arm-poky-linux-gnueabi/arm-poky-linux-gnueabi-gdb
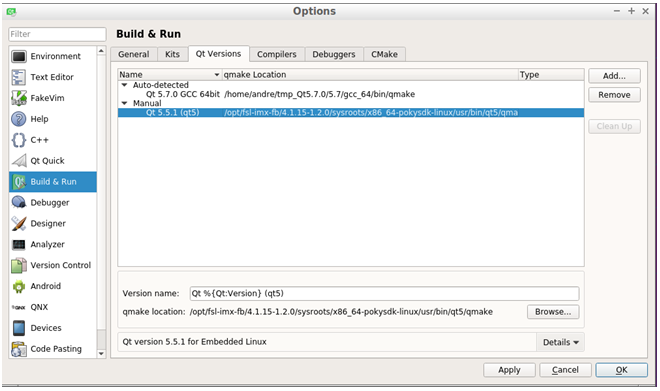
Go to the Qt Versions tab as shown in the figure below and click the Add button. Select the path to qmake. In this example qmake is located at:
/opt/fsl-imx-fb/4.1.15-1.2.0/sysroots/x86_64-pokysdk-linux/usr/bin/qt5/qmake
Go to the Kits tab and add a new kit by clicking the Add button. Choose a name for the kit and set Device type, Sysroot, Compiler, Debugger, and Qt version. The figure below shows the settings used for our setup.
Sysroot is in this example set to:
/opt/fsl-imx-fb/4.1.15-1.2.0/sysroots/cortexa9hf-vfp-neon-poky-linux-gnueabi

Connection to target
It is possible to start/stop an application on the device using an SSH connection. To configure this connection you first have to retrieve some information from the target. The instructions below assume that you have a terminal application connected to the target.
Get IP address.
ifconfig
eth0      Link encap:Ethernet  HWaddr CA:71:64:BD:1A:20
          inet addr:192.168.1.222  Bcast:192.168.1.255  Mask:255.255.255.0
          inet6 addr: fe80:
Allow root login to SSH server:
By default, SSH might not allow the user root to login. By following these instructions root will be permitted to login through an SSH connection. It is not recommended to use on a final application, but during development it can be permitted.
- Open the configuration file for the SSH server
nano /etc/ssh/sshd_config - Find the line that starts with #PermitRootLogin and remove the ‘#’ (hash) character. If you cannot find this line just add it to the file (without the hash)
PermitRootLogin yes - Save the file and exit the editor (in nano it is Ctrl-X followed by Y and Enter).
- Restart the SSH server
/etc/init.d/sshd restart
Setup a Device in Qt Creator
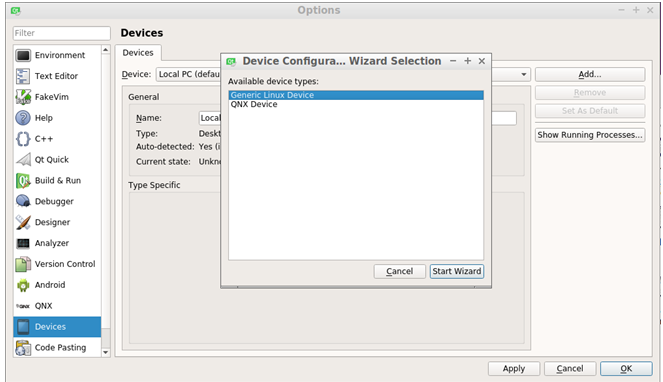
Go back to Qt Creator, Tools → Options and then select Devices in the left menu as shown in the figure below.
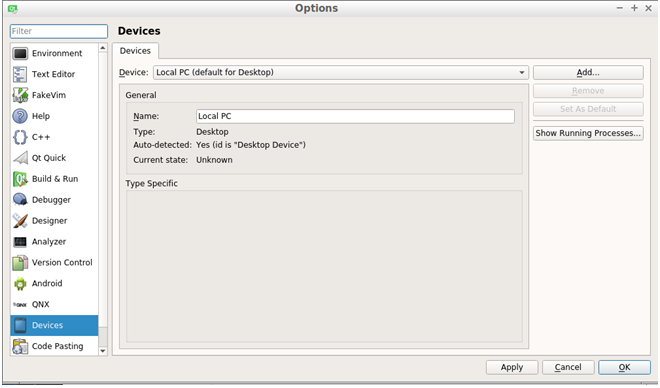
Click the Add button and select Generic Linux Device as shown in the figure below.
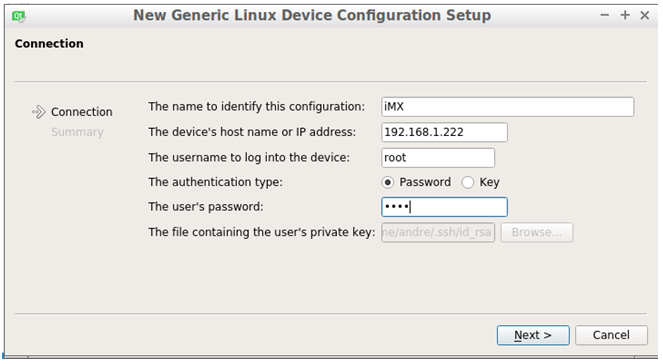
Give the device a name, enter the IP address, username and password as shown in the figure below. By default the password for the user root is pass.
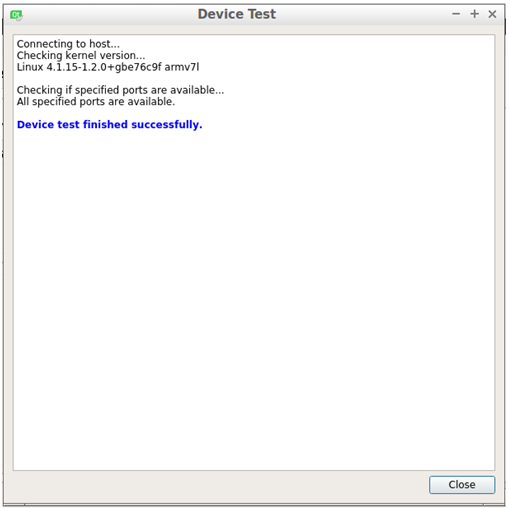
Click Next and then Finish and the connection to the target will be created and tested as shown in the figure below.
Run on target
When you have created an application it is possible to configure the project so that the application is downloaded and executed on the target. In the example below an application named TestWidget has been created.
First you need to prepare the .pro file to list target files and define installation path for the files.
-
Click on the Edit button and then the
.profile as shown in the figure below.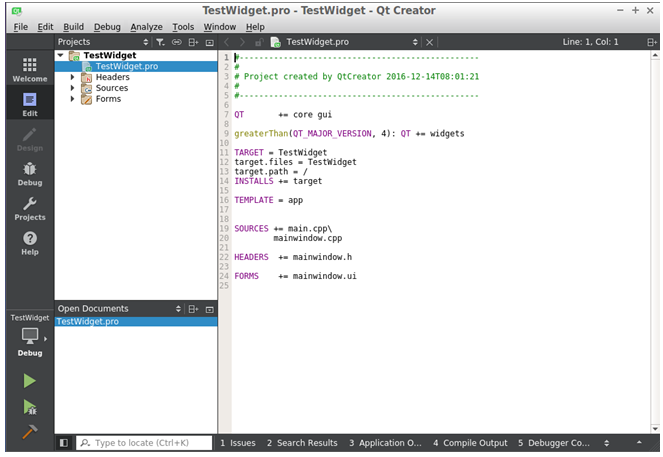
-
Add the information listed below in the
.profile. Change TestWidget to the name of your application. You can also change the path if you want the files to be installed somewhere else on the target.target.files = TestWidget
target.path = /
INSTALLS += target -
Save the file
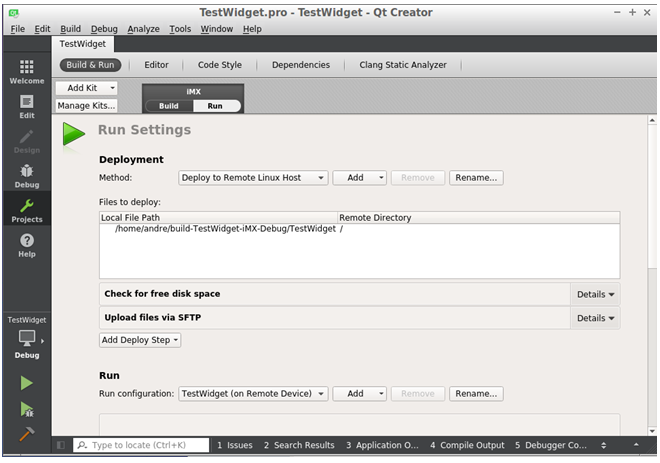
Now click on the Projects button and then on the Run configuration as shown in the figure below. In the Files to deploy area you should see the path to the application as well as the remote directory. Without the changes in the .pro file the application path and remote directory wouldn’t be listed.
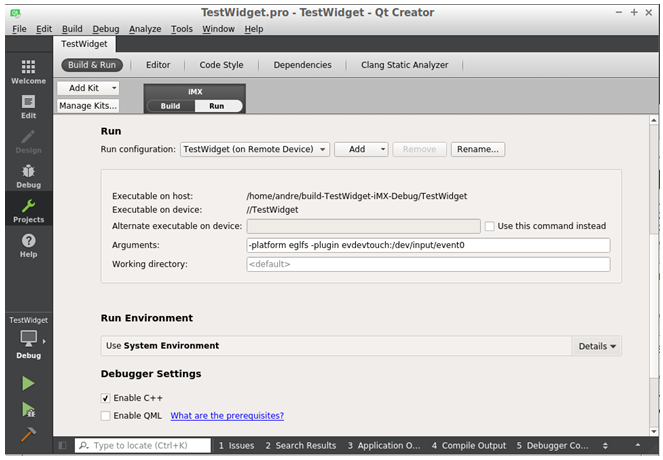
To be able to start the Qt application on the target some arguments must be given. The platform argument specifies which platform plugin to use. For Embedded Artists COM boards with a GPU and with a framebuffer as backend you choose eglfs. For the COM boards without a GPU choose linuxfb as platform. The plugin argument specifies the path to the touch device that is used (if you have a touch screen).
It is now possible to run an application on the target by clicking on the Play button. It is also possible to download and debug an application by clicking on the Debug button.
For further information about Qt application development please visit https://doc.qt.io/.