Google Coral - Machine Learning Accelerator
Introduction
This document provides you with step-by-step instructions for how to get stared with the Google Coral M.2 and/or USB accelerators on Embedded Artists iMX8 based COM boards.
Coral is a technology from Google that accelerates the processing of TensorFlow models used with machine learning. At its core there is the Edge TPU coprocessor that executes neural networks at high speed. This coprocessor is available in multiple form factors such as the M.2 Accelerator with PCIe interface or USB accelerator.
More information about Coral is available on the link below.
This document doesn’t explain what machine learning is. You need to have a basic understanding of this.
The models used by the examples in this document all come from https://coral.ai/models/ and can be divided into two categories:
- Classification, where the model can recognize a set of objects and the demo scripts will print which (if any) objects are found and with what probability. Example can be found in the Example: Image classifiction section.
- Detection, where the model can recognize a set of objects and the demo scripts will draw a rectangle in the image/video around the detected object. Example can be foind in the Example: Image detection section.
It should be possible to run classification/detection using any of the models from https://coral.ai/models/ but that is left as an exercise for the reader.
Supported hardware
The instructions in this document work with the following Developer’s Kits from Embedded Artists as the board needs to have a 64-bit core.
- iMX8M Developer’s Kit V2
- iMX8M Mini uCOM Developer’s Kit V2
- iMX8M Nano uCOM Developer’s Kit V2. Note: This board doesn’t support PCIe.
You also need a Coral M.2 Accelerator with A+E key or a Coral USB Accelerator.
- https://coral.ai/products/m2-accelerator-ae/
- https://eu.mouser.com/new/google-coral/coral-m2-accelerator-ae/
- https://coral.ai/products/accelerator
- https://eu.mouser.com/ProductDetail/Coral/G950-01456-01?qs=u16ybLDytRbcxxqFKdbhgQ%3D%3D
Get started
Setup hardware
M.2 Accelerator
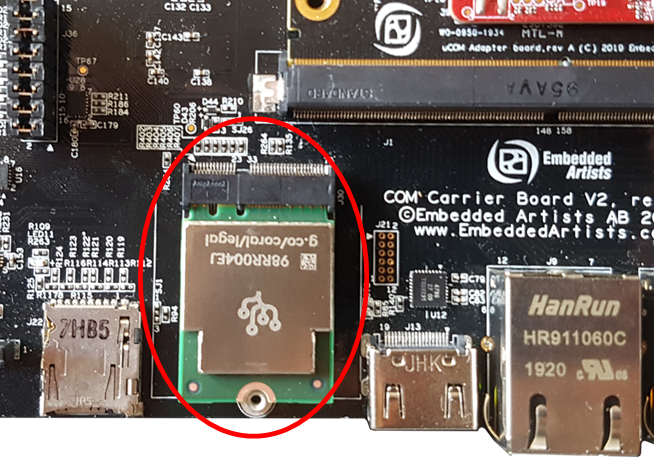
You need a COM Carrier board V2 for these instructions.
The iMX8M Nano doesn’t have a PCIe interface. Use the USB accelerator instead.
All you need to do is insert the Coral M.2 Accelerator to the M.2 E-key connector on the COM Carrier board V2 as shown in the figure below.
USB Accelerator
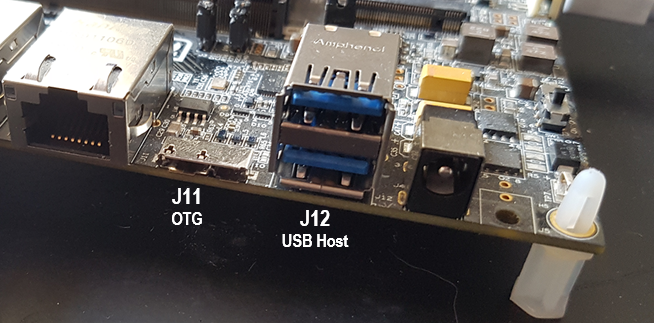
For iMX8M Mini uCOM and iMX8M Developer’s Kits you can connect the USB accelerator directly to USB Host Type A connector (J12) on the carrier board, see the first figure below.
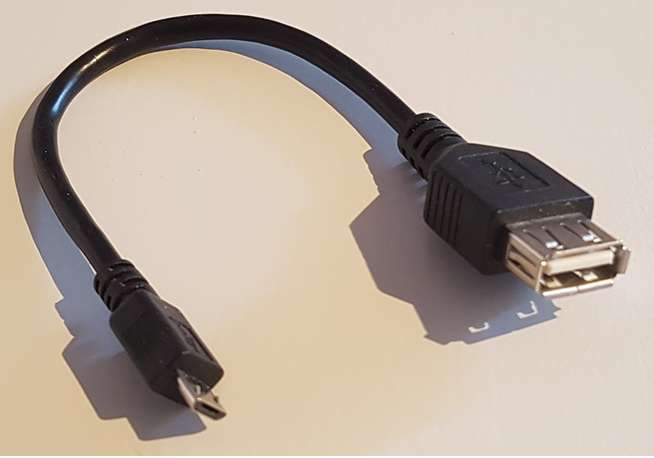
The iMX8M Nano uCOM only has one USB port which by default is connected to USB OTG connector (J11). You need a micro-B (male) to USB A (female) adapter similar to the one shown in the second figure below.
It is possible to change a slider switch, S3:8, on the back of the uCOM adapter board and thereby connecting the USB port on the iMX8M Nano to the USB Host Type A connector (J12) on the carrier board. See section 7.2 in the iMX8M Nano uCOM datasheet for details.
If you want to try the camera related examples, described in the Example: Camera section together with the iMX8M Nano you need to change the slider switch. The reason is both the accelerator and the camera need a USB interface.
Download and flash pre-built Yocto image
To be able to setup and use Coral you need software (mostly Python packages) that is not normally installed on a standard ea-image-base distribution. Images with as many as possible of the needed packages have been prepared and are available on https://sw.embeddedartists.com. Go to this website and download the zip file that ends with _coral.zip for the board you are using.
Unpack this zip file on your computer and setup your iMX Developer’s Kit for OTG boot mode (see the document Working with Yocto for details). Flash the full image by using UUU and the full_tar.uuu script file.
uuu full_tar.uuu
Enable PCIe support
You only need to use the PCIe-related dtb file if you use the M.2 Accelerator. If you use the USB accelerator you don’t need to change the fdt_file variable.
Reset the board and boot into the U-Boot console. You need to hit any key on your keyboard to stop autoboot. Go to the section below that corresponds to the board you are using.
iMX8M COM board
Change to the device tree file that enables PCIe support.
setenv fdt_file imx8mq-ea-com-kit_v2-pcie.dtb
saveenv
boot
iMX8M Mini uCOM board
Change to the device tree file that enables PCIe support.
setenv fdt_file imx8mm-ea-ucom-kit_v2-pcie.dtb
saveenv
boot
Install Edge TPU runtime
The Edge TPU runtime is available as a Debian package. Support for Debian package manager has been added to the Yocto image, but you also must add a Google repository so the package can be found.
You need Internet access for this to work.
echo "deb https://packages.cloud.google.com/apt coral-edgetpu-stable main" | tee /etc/apt/sources.list.d/coral-edgetpu.list
Update the package index.
apt-get update
You will most likely get several errors while running update since the main package feed probably don’t exist. The prebuilt image from the Download and flash pre-built Yocto image section was created on a computer with IP address 192.168.1.11 and that is where apt-get will look for the package feed.
You will also get warnings regarding the Google repository about it having an invalid signature. You can ignore this for now.
Err:1 http://192.168.1.11:5678/all ./ InRelease
  Could not connect to 192.168.1.11:5678 (192.168.1.11). - connect (111: Connection refused)
...
Get:5 https://packages.cloud.google.com/apt coral-edgetpu-stable InRelease [6332 B]
Ign:5 https://packages.cloud.google.com/apt coral-edgetpu-stable InRelease
Get:6 https://packages.cloud.google.com/apt coral-edgetpu-stable/main arm64 Packages [1174 B]
Fetched 7506 B in 0s (8904 B/s)
Reading package lists... Done
W: Failed to fetch http://192.168.1.11:5678/all/./InRelease  Could not connect to 192.168.1.11:5678 (192.168.1.11). - connect (111: Connection refused)
W: Failed to fetch http://192.168.1.11:5678/aarch64/./InRelease  Unable to connect to 192.168.1.11:5678:
W: Failed to fetch http://192.168.1.11:5678/aarch64-mx8mm/./InRelease  Unable to connect to 192.168.1.11:5678:
W: Failed to fetch http://192.168.1.11:5678/imx8mmea_ucom/./InRelease  Unable to connect to 192.168.1.11:5678:
W: Some index files failed to download. They have been ignored, or old ones used instead.
Download and install the Edge TPU runtime environment. Enter ‘y’ to acknowledge that you want to install the package without verification. The warning comes as the signature of the Google repository is not known (could have been fixed by adding / using apt-key).
apt-get install libedgetpu1-std
Reading package lists... Done
Building dependency tree... Done
The following NEW packages will be installed:
  libedgetpu1-std
0 upgraded, 1 newly installed, 0 to remove and 0 not upgraded.
Need to get 248 kB of archives.
After this operation, 814 kB of additional disk space will be used.
WARNING: The following packages cannot be authenticated!
  libedgetpu1-std
Install these packages without verification? [y/N]
Install TensorFlow Lite
TensorFlow Lite is used to run machine learning models. Here we will install TensorFlow Lite for Python. There are different packages for different versions of Python and for different platforms. The original instructions are available at the link below.
https://www.tensorflow.org/lite/guide/python
The Python version installed in the pre-built image for Linux 5.4.24 is 3.7 and for iMX8 based boards the platform is Linux (ARM 64):
pip3 install https://dl.google.com/coral/python/tflite_runtime-2.1.0.post1-cp37-cp37m-linux_aarch64.whl
The Python version installed in the pre-built image for Linux 4.14.98 is 3.5 and for iMX8 based boards the platform is Linux (ARM 64):
pip3 install https://dl.google.com/coral/python/tflite_runtime-2.1.0.post1-cp35-cp35m-linux_aarch64.whl
Example: Image classification
Follow the steps below to install example model that can be used to classify images of certain birds.
cd && mkdir -p coral && cd coral
git clone https://github.com/google-coral/tflite.git
cd tflite/python/examples/classification
bash install_requirements.sh
The last instruction will install the example’s dependencies. It will also download a photo of a Parrot that will be classified. The downloaded model files include a text file containing a list of all the birds that the model can classify.
less models/inat_bird_labels.txt
0 Haemorhous cassinii (Cassin's Finch)
1 Aramus guarauna (Limpkin)
...
Run example
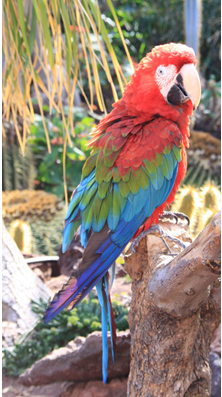
To classify the parrot in the figure below run the instructions that follow.
First, we must make sure Python can find the Edge TPU library.
export LD_LIBRARY_PATH=/usr/lib/aarch64-linux-gnu/
Now run the classify model on the Edge TPU. The script will run the model 5 times and the first time it will be a bit slower since it must load the model into the Edge TPU memory.
python3 classify_image.py \
  --model models/mobilenet_v2_1.0_224_inat_bird_quant_edgetpu.tflite \
  --labels models/inat_bird_labels.txt \
  --input images/parrot.jpg
----INFERENCE TIME----
Note: The first inference on Edge TPU is slow because it includes loading the model into Edge TPU memory.
13.7ms
2.9ms
2.6ms
2.6ms
2.9ms
-------RESULTS--------
Ara macao (Scarlet Macaw): 0.77734
To get a sense of how much the Edge TPU accelerates the classification, you can also try to run this model directly on the processor to see the how much slower it is.
python3 classify_image.py \
  --model models/mobilenet_v2_1.0_224_inat_bird_quant.tflite \
  --labels models/inat_bird_labels.txt \
  --input images/parrot.jpg
----INFERENCE TIME----
Note: The first inference on Edge TPU is slow because it includes loading the model into Edge TPU memory.
148.5ms
147.2ms
147.1ms
147.1ms
147.2ms
-------RESULTS--------
Ara macao (Scarlet Macaw): 0.7773
Both runs above correctly detect the bird as an Ara macao with the same probability (77%) which is the expected result given that the input image and the model is the same. The accelerator does it about 50 times faster (2.9ms vs 147.2ms).
We can also try to classify other images of birds. Try for example to download this image of a Rook.
curl https://upload.wikimedia.org/wikipedia/commons/6/63/Rook_at_Slimbridge_Wetland_Centre%2C_Gloucestershire%2C_England_22May2019_arp.jpg --output images/rook.jpg
python3 classify_image.py \
  --model models/mobilenet_v2_1.0_224_inat_bird_quant_edgetpu.tflite \
  --labels models/inat_bird_labels.txt \
  --input images/rook.jpg

----INFERENCE TIME----
Note: The first inference on Edge TPU is slow because it includes loading the model into Edge TPU memory.
13.7ms
3.2ms
2.9ms
3.0ms
3.6ms
-------RESULTS--------
Corvus frugilegus (Rook): 0.78516
Example: Image detection
Follow the steps below to install an example model that can be used to detect objects in an image. The git repository is the same as in the previous example so if you have followed the instructions in the Example: Image classification section then skip the git clone command below.
cd && mkdir -p coral && cd coral
git clone https://github.com/google-coral/tflite.git
cd tflite/python/examples/detection
sed -i 's/mobilenet_ssd/ssd_mobilenet/g' install_requirements.sh
bash install_requirements.sh
The sed command above will correct the name of the model. That error has been reported and fixed but is not yet released. The last instruction will install the example’s dependencies. It will also download a photo of Grace Hopper that will be used for image detection.
The downloaded model files include a text file containing a list of all the objects that the model can detect.
less models/coco_labels.txt
0  person
1  bicycle
2  car
...
Run example
To detect objects in the figure below run the instructions below.

First, we must make sure Python can find the Edge TPU library.
export LD_LIBRARY_PATH=/usr/lib/aarch64-linux-gnu/
Now run the classify model on the Edge TPU. The script will run the model 5 times and the first time it will be a bit slower since it must load the model into the Edge TPU memory.
python3 detect_image.py \
  --model models/ssd_mobilenet_v2_coco_quant_postprocess_edgetpu.tflite \
  --labels models/coco_labels.txt \
  --input images/grace_hopper.bmp \
  --output images/grace_hopper_processed.bmp
----INFERENCE TIME----
Note: The first inference is slow because it includes loading the model into Edge TPU memory.
53.21 ms
15.53 ms
17.62 ms
15.66 ms
15.43 ms
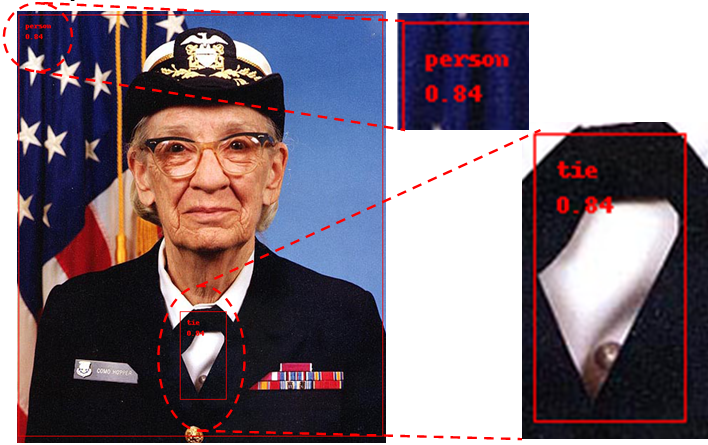
-------RESULTS--------
tie
id: 31
score: 0.83984375
bbox: BBox(xmin=226, ymin=417, xmax=290, ymax=539)
person
id: 0
score: 0.83984375
bbox: BBox(xmin=2, ymin=5, xmax=507, ymax=590)
To get a sense of how much the Edge TPU accelerates the detection, you can also try to run this model directly on the processor to see the how much slower it is.
python3 detect_image.py \
  --model models/ssd_mobilenet_v2_coco_quant_postprocess.tflite \
  --labels models/coco_labels.txt \
  --input images/grace_hopper.bmp \
  --output images/grace_hopper_processed.bmp
----INFERENCE TIME----
Note: The first inference is slow because it includes loading the model into Edge TPU memory.
318.96 ms
312.84 ms
312.23 ms
312.17 ms
312.41 ms
-------RESULTS--------
person
  id:     0
  score:  0.83984375
  bbox:   BBox(xmin=2, ymin=5, xmax=507, ymax=590)
tie
  id:     31
  score:  0.83984375
  bbox:   BBox(xmin=225, ymin=417, xmax=291, ymax=539)
Both runs above correctly detect both the person and the tie in the image with the same probabilities (84%) but the accelerator does it about 20 times faster (15.43ms vs 312.41ms). Download the output image (grace_hopper_processed.bmp) to a PC to view it or, if you have a display connected use the framebuffer image viewer:
fbi -a -T 1 images/grace_hopper_processed.bmp
On Linux 4.14.98 using the image viewer breaks the desktop. Run the following command after viewing the image to restart the desktop:
systemctl restart Weston
If nothing is shown on the display when running fbi this can be because of an unsupported resolution for the framebuffer. From within U-Boot you can set the kernel parameter video like this
setenv extra_bootargs video=1280x720
The image will look like this:
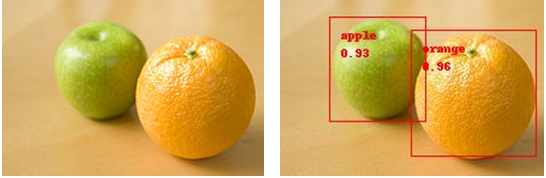
We can also try to detect objects from the list in other images. Try for example to download this image of an apple and an orange.
curl https://upload.wikimedia.org/wikipedia/commons/thumb/a/a8/Apple_and_Orange_-_they_do_not_compare.jpg/220px-Apple_and_Orange_-_they_do_not_compare.jpg --output images/ao.jpg
python3 detect_image.py \
  --model models/ssd_mobilenet_v2_coco_quant_postprocess_edgetpu.tflite \
  --labels models/coco_labels.txt \
  --input images/ao.jpg \
  --output images/ao_processed.jpg
----INFERENCE TIME----
Note: The first inference is slow because it includes loading the model into Edge TPU memory.
53.10 ms
16.93 ms
15.12 ms
16.69 ms
15.81 ms
-------RESULTS--------
orange
  id:     54
  score:  0.96484375
  bbox:   BBox(xmin=109, ymin=29, xmax=213, ymax=134)
apple
  id:     52
  score:  0.93359375
  bbox:   BBox(xmin=41, ymin=18, xmax=121, ymax=105)
Example: Camera
For the iMX8M Nano you need to change a slider switch to be able to connect both the camera and the USB accelerator, see the USB Accelerator section above.
This example requires a camera (described in the How to use a Camera with an iMX Developer’s Kit) and a display. The instructions in this document were tested on a Logitech QuickCam Pro USB camera and the Embedded Artists 7-inch HDMI Display Kit but any HDMI display should work.
Follow the steps below to prepare the example that can be used to classify or detect objects in a live camera feed.
cd && mkdir -p coral && cd coral
git clone https://github.com/google-coral/examples-camera.git
cd examples-camera
sh download_models.sh
cd gstreamer
sed -i 's/ximagesink/waylandsink/g' gstreamer.py
sed -i 's/if detectCoralDev.*/if False:/' gstreamer.py
pip3 install svgwrite
The first sed command above is needed as the file system is using Wayland and not the X Window System. The second sed command prevents the gstreamer.py script from thinking that the iMX8M COM board is the Google Coral Dev Board.
Run classification example
First, we must make sure Python can find the Edge TPU library.
export LD_LIBRARY_PATH=/usr/lib/aarch64-linux-gnu/
Now run the classify model on the Edge TPU. It will take a couple of seconds to start and then the video feed should appear on the display. The console will print out what is found
python3 classify.py
Loading ../all_models/mobilenet_v2_1.0_224_quant_edgetpu.tflite with ../all_models/imagenet_labels.txt labels
...
  Inference: 4.28 ms FPS: 15 fps score=0.18: mouse, computer mouse score=0.11: lampshade, lamp shade score=0.10: monitor
  Inference: 4.16 ms FPS: 15 fps score=0.24: mouse, computer mouse
...
Stop the demo with Ctrl+C.
To test without the Edge TPU:
python3 classify.py \
  --model ../all_models/mobilenet_v2_1.0_224_quant.tflite
Loading ../all_models/mobilenet_v2_1.0_224_quant.tflite with ../all_models/imagenet_labels.txt labels.
...
  Inference: 141.61 ms FPS: 7 fps score=0.11: mouse, computer mouse
  Inference: 141.43 ms FPS: 7 fps score=0.13: mouse, computer mouse
...
Note that the inference is 34 times slower without the acceleration (4.16 vs 141.43ms). With the accelerator the frame rate is limited by the camera’s capture rate to 15fps but without acceleration the inference time limits the frame rate to a maximum of 1000/141.43 = 7fps.
Run detection example
First, we must make sure Python can find the Edge TPU library.
export LD_LIBRARY_PATH=/usr/lib/aarch64-linux-gnu/
Now run the detect model on the Edge TPU. The script will take a couple of seconds to start and then the video feed should appear on the display. The console will only print out statistics.
python3 detect.py
Loading ../all_models/mobilenet_ssd_v2_coco_quant_postprocess_edgetpu.tflite with ../all_models/coco_labels.txt labels.
...
Inference: 15.76 ms FPS: 15 fps
Inference: 15.49 ms FPS: 15 fps
Inference: 15.62 ms FPS: 15 fps
...
Stop the demo with Ctrl+C.
To test without the Edge TPU:
python3 detect.py --model \
  ../all_models/mobilenet_ssd_v2_coco_quant_postprocess.tflite
Loading ../all_models/mobilenet_ssd_v2_coco_quant_postprocess.tflite with ../all_models/coco_labels.txt labels.
...
Inference: 317.38 ms FPS: 3 fps
Inference: 316.86 ms FPS: 3 fps
Inference: 316.46 ms FPS: 3 fps
...
Note that the inference is 20 times slower without the acceleration (15.62 vs 316.46ms). With the accelerator the frame rate is limited by the camera’s capture rate to 15fps but without acceleration the inference time limits the frame rate to a maximum of 1000/316.46 = 3fps.
Troubleshooting
Cannot find libedgetpu.so.1
If you get an error message similar to below the most likely problem is that you have forgotten to set LD_LIBRARY_PATH as explained in the Image classification - Run Example section. You could also have forgot or failed to install the TPU Edge runtime library as explained in the Install Edge TPU runtime section above.
OSError: libedgetpu.so.1: cannot open shared object file: No such file or directory
ValueError: Failed to load delegate from libedgetpu.so.1
Error message:
ValueError: Failed to load delegate from libedgetpu.so.1
Reason 1:
PCIe is not enabled. Please make sure you have followed the instructions in the Enable PCIe support section above.
Reason 2:
You could also get this error message if the M.2 Accelerator isn’t inserted into the M.2 connector on the COM Carrier board V2.
You can check if the M.2 Accelerator is detected on the PCIe bus by using lspci.
lspci | grep 089a
You should get a result similar to below.
01:00.0 System peripheral: Device 1ac1:089a
You can also check if the PCIe driver (Apex) is loaded and available.
lsmod | grep apex
apex                   24576  0
gasket                 94208  1 apex
Cannot identify device '/dev/video0'
Error message:
Error: gst-resource-error-quark: Cannot identify device '/dev/video0'. (3): ../../../git/sys/v4l2/v4l2_calls.c(656): gst_v4l2_open (): /GstPipeline:pipeline0/GstV4l2Src:v4l2src0:
system error: No such file or directory
Reason 1:
The camera is not connected. Check that the camera is connected correctly, reboot and test again
Reason 2:
The camera is not mapped as /dev/video0. Check which video device is in use:
ls /dev/video*
/dev/video1
Use the found device when running the camera examples by passing the -videosrc parameter like this:
python3 detect.py --videosrc /dev/video1
Yocto image
This section shows how the pre-built Yocto image has been created in case you need to build it yourself.
Debian package manager
Support for the Debian package manager (apt) is needed to install the Edge TPU runtime.
Do the following modifications to your conf/local.conf.
Change package class from rpm to deb.
#PACKAGE_CLASSES ?= "package_rpm"
PACKAGE_CLASSES ?= "package_deb"
Enable package-management.
IMAGE_FEATURES_append = " package-management"
You can also set a default package feed. Replace the IP address below with your own.
PACKAGE_FEED_URIS = "http://192.168.1.11:5678"
Add apt to the image.
This program is added in IMAGE_INSTALL_append, see the Additional packages] section below.
Additional packages
Also make sure the following packages are added to your build.
IMAGE_INSTALL_append = "\
   apt \
   git \
   curl \
   python3 \
   python3-numpy \
   python3-pip \
   python3-dev \
   python3-pygobject \
   python3-pyparsing \
   libjpeg-turbo-dev \
   packagegroup-core-buildessential \
   gnupg \
   glib-2.0 \
   gtk+3 \
"