GPIO
Many of the available GPIO pins are available on the expansion connectors. Check exactly which pins are available on the board used, because they all differ in number of available GPIO pins.
Note that a pin must be declared as a GPIO before it can be used and manipulated as a GPIO. Error messages are not always given if a declaration is missing in the device tree file.
Also note that if a pin is already declared and used in the device tree file, then it is not possible to use it as a general GPIO.
U-Boot
Not applicable.
Linux - libgpiod
The libgpiod project is a C library and tools for interacting with GPIO character devices. It has been added to ea-image-base builds from 2021-01-22.
The gpiodetect command can be used to list all GPIO chips that are available. In the example below GPIO chips 0 – 5 are built-in to the processor while GPIO chip 5 is a GPIO expander attached to the I2C bus on COM Carrier Board V2.
gpiodetect
gpiochip0 [30200000.gpio] (32 lines)
gpiochip1 [30210000.gpio] (32 lines)
gpiochip2 [30220000.gpio] (32 lines)
gpiochip3 [30230000.gpio] (32 lines)
gpiochip4 [30240000.gpio] (32 lines)
gpiochip5 [1-0020] (16 lines)
The gpioinfo command can be used to get more information about a GPIO chip. The command will list all available GPIO lines (pins), the name of the line, how it is configured and if it is already used. In the example below info about GPIO chip 5 is listed. Lines 13-15 show the lines that are connected to the button and LEDs on COM Carrier Board V2 that are described in the I2C GPIO Expander - COM Carrier Board V2 section below.
gpioinfo 5
line 0: "BT_REG_ON" "?"              output active-high [used]
line 1: "WL_REG_ON" "reset"          output active-low  [used]
line 2: "VBAT_VSEL" "hog_VBAT_VSEL"  output active-high [used]
...
line 13: "USER_BTN"  unused          output active-high
line 14: "USER_LED1" unused          output active-high
line 15: "USER_LED2" unused          output active-high
The gpioset command can be used to set a GPIO line. In the example below USER_LED1 will turn on.
gpioset 5 14=1
The gpioget command can be used to read the value of a GPIO line. In the example below the value of USER_BTN will be read.
gpioget 5 13
More information about libgpiod can be found on this link: https://embeddedbits.org/new-linux-kernel-gpio-user-space-interface/
Linux - sysfs
Assuming that a pin (in this example GPIO6_IO13) is configured as GPIO in the device tree file and is not already in used then it can be examined and manipulated from the command line in Linux.
The GPIO pins are controlled with special files in sysfs.
To use a pin it must first be configured as GPIO and to do that the pin's port and pin number must be converted into a number with this formula:
Num = (Port - 1)*32 + Pin
So for GPIO6_IO13 the number is (6 - 1)*32 + 13 = 173.
To configure the pin
echo 173 > /sys/class/gpio/export
If that is successful then a new folder should have been created (see gpio173 below).
ls /sys/class/gpio/
export     gpiochip0     gpiochip160   gpiochip32   gpiochip96
gpio173    gpiochip128   gpiochip192   gpiochip64   unexport
A closer inspection of the exported GPIO.
ls /sys/class/gpio/gpio173
active_low   direction   power       uevent
device       edge        subsystem   value
To configure the pin as an input and read the current value (0 or 1).
echo in > /sys/class/gpio/gpio173/direction
cat /sys/class/gpio/gpio173/value
0
To configure the pin as an output and set it high.
echo out > /sys/class/gpio/gpio173/direction
echo 1 > /sys/class/gpio/gpio173/value
An alternative way.
echo high > /sys/class/gpio/gpio173/direction
To set the output low you do the same as above, but use the value 0 or low instead.
I2C GPIO Expander
- COM Carrier Board V1
- COM Carrier Board V2
- uCOM Carrier Board V3
COM Carrier Board V1 does not have the I2C GPIO Expander.
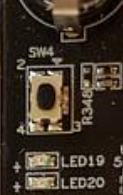
The COM Carrier Board V2 has an I2C controlled GPIO Expander (PCA6416 on I2C address 0x20). From a user perspective it does not matter that the GPIOs are I2C controlled as they can be manipulated in mostly the same way as a normal GPIO pins on the CPU.
The GPIO Expander controls several GPIOs. Here we focus on the button and two LEDs:
| Board | Label | sysfs GPIO | libgpiod |
|---|---|---|---|
| Button (SW4) | USER_BTN | 509 | gpiochip5 line 13 |
| LED19 | USER_LED1 | 510 | gpiochip5 line 14 |
| LED20 | USER_LED2 | 511 | gpiochip5 line 15 |
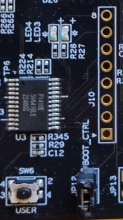
The uCOM Carrier Board V3 has an I2C controlled GPIO Expander (PCA6416 on I2C address 0x21). From a user perspective it does not matter that the GPIOs are I2C controlled as they can be manipulated in mostly the same way as a normal GPIO pins on the CPU.
The GPIO Expander controls several GPIOs. Here we focus on the button and two LEDs:
| Board | Label | sysfs GPIO | libgpiod |
|---|---|---|---|
| Button (SW6) | USER_BTN | 509 | gpiochip5 line 13 |
| LED3 | USER_LED_RED | 510 | gpiochip5 line 14 |
| LED4 | USER_LED_GREEN | 511 | gpiochip5 line 15 |
sysfs
The GPIO numbers are not assigned with the same formula as was described in the Linux - sysfs section. To see which number is assigned to the button and the LEDs.
grep USER /sys/kernel/debug/gpio
  gpio-509 (USER_BTN )
  gpio-510 (USER_LED1 )
  gpio-511 (USER_LED2 )
To read the button state (0 = button pressed, 1 = button not pressed).
echo 509 > /sys/class/gpio/export
echo in > /sys/class/gpio/gpio509/direction
cat /sys/class/gpio/gpio509/value
1
A simple way to do repeated reading of the button once per second (abort with Ctrl+C).
watch -n 1 cat /sys/class/gpio/gpio509/value
Every 1s: cat /sys/class/gpio/gpio509/value 2019-02-08 08:04:25
1
The LEDs are on if the value is 1 and off if it is 0 so to turn LED19 on and then off.
echo 510 > /sys/class/gpio/export
echo high > /sys/class/gpio/gpio510/direction
echo low > /sys/class/gpio/gpio510/direction
libgpiod
See the Linux - libgpiod section for more information about how to use libgpiod with the USER_BTN, USER_LED1, and USER_LED2.